Introduction
There’s something undeniably comforting about the smell of homemade cinnamon rolls wafting through your kitchen. The allure of these delightful pastries transcends mere taste; it evokes memories of cozy mornings, family gatherings, and perhaps even a drizzle of nostalgia as you savor each gooey bite. Homemade cinnamon rolls are more than just a breakfast treat; they represent a labor of love, combining simple ingredients to create a warm, soft, and utterly indulgent experience.
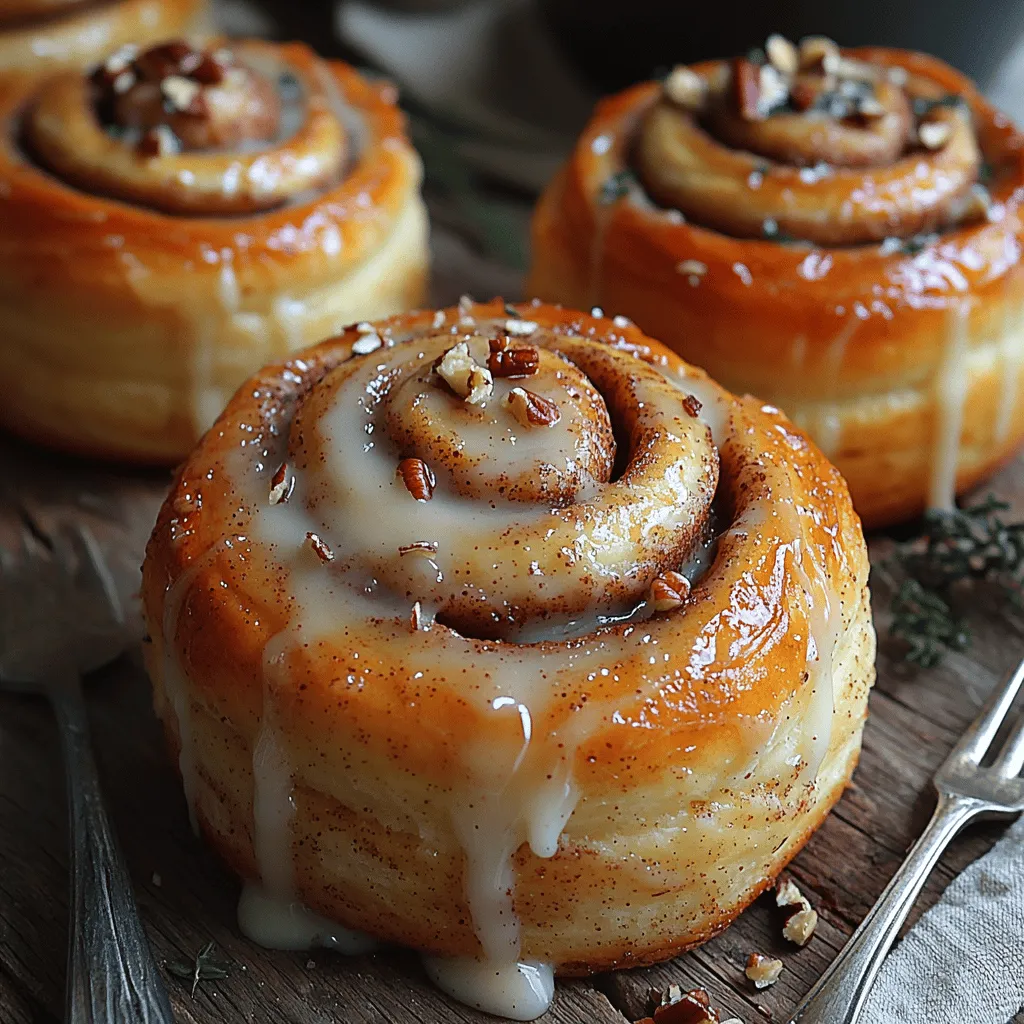
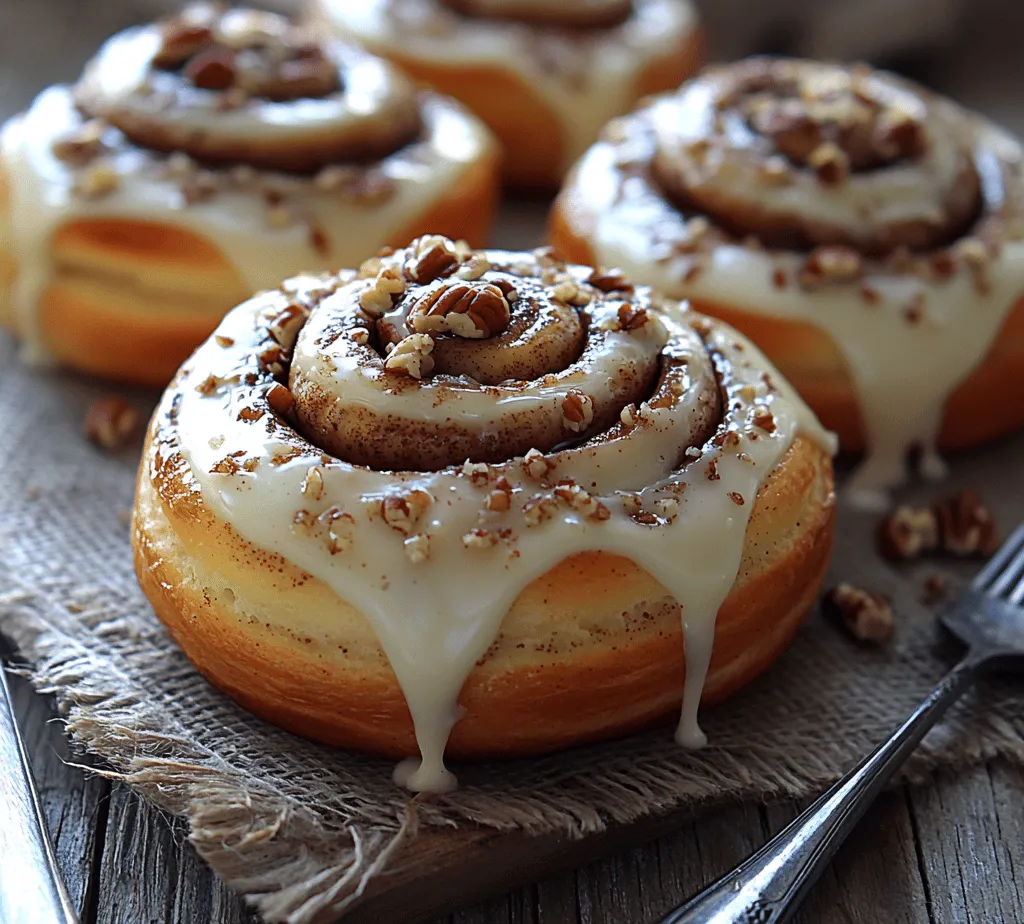
What makes our Heavenly Twisted Cinnamon Rolls truly exceptional is their irresistibly soft and gooey texture, coupled with a rich, cinnamon-infused flavor that dances on your palate. Each bite reveals layers of dough interspersed with a sweet filling, culminating in a decadent treat that is hard to resist. When topped with a luscious cream cheese frosting, these rolls elevate the standard breakfast pastry into a heavenly experience that can rival any bakery’s offering.
The art of making cinnamon rolls lies not only in the recipe but also in the quality of ingredients and the methods used. To achieve that perfect rise and texture, it’s essential to use high-quality flour, fresh spices, and real butter. Additionally, employing traditional techniques in crafting the dough will yield results that are both rewarding and delicious. In this guide, we will take you through the step-by-step process of creating these delightful rolls from scratch, ensuring that you can recreate this beloved treat in your own kitchen.
Understanding the Ingredients
Creating the perfect cinnamon roll begins with understanding the primary components that make up its dough. The base of our Heavenly Twisted Cinnamon Rolls consists of all-purpose flour, yeast, warm milk, sugar, eggs, and butter. Each of these ingredients plays a crucial role in achieving that ideal texture.
The Dough Components
– All-Purpose Flour: This is the backbone of your cinnamon roll dough. It provides structure and strength, allowing the rolls to rise beautifully while maintaining a tender crumb.
– Yeast: The magic ingredient that causes the dough to rise. Active dry yeast is commonly used, which requires activation before being mixed into the dough. It’s essential for creating that light, fluffy texture we all crave in cinnamon rolls.
– Warm Milk: This not only helps to activate the yeast but also enriches the dough. The warmth of the milk encourages the yeast to flourish, contributing to a better rise.
– Sugar: Not just for sweetness; sugar acts as food for the yeast and helps in browning the rolls during baking.
– Eggs: Eggs add richness and moisture to the dough, enhancing the overall flavor and texture.
– Butter: The use of unsalted butter contributes to the flavor and tenderness of the dough. It also creates a rich mouthfeel that makes each bite irresistible.
The Filling Ingredients
The filling is where the magic truly happens. For our Heavenly Twisted Cinnamon Rolls, we use a combination of brown sugar, ground cinnamon, and melted butter. This trio creates a sweet, aromatic mixture that seeps into the dough during baking.
– Brown Sugar: This adds a deep, caramel-like flavor that complements the cinnamon perfectly. The moisture in brown sugar also helps keep the filling gooey.
– Ground Cinnamon: The star of the show, cinnamon lends its warm, spicy notes that define the essence of classic cinnamon rolls.
– Melted Butter: This binds the filling ingredients together, allowing for easy spreading and enhancing the overall richness.
Cream Cheese Frosting
No cinnamon roll is complete without a generous drizzle of cream cheese frosting. This velvety topping balances the sweetness of the rolls and adds a tangy flavor that elevates every bite. Made with cream cheese, powdered sugar, and a touch of vanilla extract, it’s the finishing touch that transforms these rolls into a truly heavenly treat.
Preparing the Dough
Now that we have an understanding of the ingredients, it’s time to prepare the dough, which is the foundation of our Heavenly Twisted Cinnamon Rolls. The process begins with activating the yeast, a crucial step that ensures your rolls will rise beautifully.
Activating Yeast
To activate the yeast, start by gently warming your milk. You want it to be warm to the touch, roughly between 100°F to 110°F (37°C to 43°C). If the milk is too hot, it can kill the yeast, and if it’s too cold, the yeast won’t activate properly. Once your milk is at the right temperature, sprinkle the active dry yeast on top, along with a teaspoon of sugar to feed it. Let it sit for about 5 to 10 minutes until it becomes frothy. This bubbling action indicates that your yeast is alive and ready to work its magic in your dough.
Mixing Ingredients
In a large mixing bowl, combine your activated yeast mixture with the remaining sugar, eggs, and melted butter. Whisk these ingredients together until well combined. Gradually add in the all-purpose flour, one cup at a time, mixing until a soft dough begins to form.
At this point, you may need to switch to using your hands or a wooden spoon to incorporate the flour fully. The goal is to achieve a dough that is slightly sticky but manageable. If the dough feels too wet, you can add a little more flour, but be careful not to overdo it, as too much flour will result in dense rolls.
Kneading the Dough
Once your dough has come together, it’s time to knead. Sprinkle a clean surface with a bit of flour to prevent sticking. Turn the dough out onto the floured surface and begin kneading by pushing the dough away from you with the heel of your hand. Fold it back over itself and give it a quarter turn. Repeat this process for about 8 to 10 minutes, or until the dough is smooth and elastic.
Kneading is essential for developing gluten, which gives the rolls their characteristic chewiness. You’ll know your dough is ready when it springs back lightly when pressed with your finger.
Creating the Perfect Filling
With your dough prepared and resting, it’s time to focus on the filling that will make these cinnamon rolls truly special. A well-executed filling is crucial for adding flavor and moisture to your rolls.
Preparing the Cinnamon Filling
In a medium bowl, combine brown sugar and ground cinnamon. The ratio of sugar to cinnamon is typically 2:1, but feel free to adjust according to your taste preferences. For a more intense cinnamon flavor, you can increase the amount of cinnamon.
Melt your butter until it’s completely liquid, then pour it into the sugar and cinnamon mixture. Stir until you have a thick, paste-like filling. This filling should be spreadable but not too runny. If it’s too thick, you can add a bit more melted butter to achieve the right consistency.
Customizing Your Filling
For those looking to add a bit of texture or extra flavor to their cinnamon rolls, consider incorporating chopped nuts or raisins into the filling. Walnuts or pecans add a delightful crunch, while raisins infuse a hint of chewiness. Simply fold them into the cinnamon mixture before spreading it onto the dough.
Rolling and Shaping the Dough
Once your dough has risen and your filling is ready, it’s time to roll and shape your cinnamon rolls. This step is where your rolls begin to take form, and attention to detail here will yield beautiful results.
Rolling Out the Dough
Begin by lightly flouring your work surface again. Turn your risen dough onto the floured surface and gently punch it down to release any air bubbles. Using a rolling pin, roll the dough into a rectangular shape, roughly 16 inches long and 12 inches wide. Aim for an even thickness of about 1/4 inch; this will ensure consistent baking and a nice rise.
Spreading the Filling
Once your dough is rolled out, spread the cinnamon filling evenly across the surface using a spatula or the back of a spoon. Be careful not to tear the dough as you spread; if you find the dough is sticking, you can sprinkle a bit more flour on the surface.
Rolling the Dough
With the filling spread evenly, it’s time to roll the dough into a log. Start from one long edge and roll it tightly toward the opposite end. As you roll, try to maintain an even pressure to keep the dough from tearing. Once you’ve rolled it up completely, pinch the seam to seal it and ensure the filling doesn’t escape during baking.
With the log formed, use a sharp knife or a piece of dental floss to cut it into individual rolls. Aim for about 1.5 inches thick for each roll, which will give you a nice balance between surface area for frosting and the gooey filling inside.
The Art of the Second Rise
After shaping your rolls, place them in a greased baking dish, ensuring there’s enough space between each roll for them to expand. Cover the dish with a clean kitchen towel or plastic wrap, and allow them to rise again in a warm place until they have doubled in size, which usually takes about 30 to 45 minutes.
This second rise is crucial, as it allows the rolls to become airy and light. Once they’ve puffed up beautifully, they’re ready to be baked to golden perfection.
Stay tuned for the next part of this guide, where we will delve into the baking process and how to create that luscious cream cheese frosting that will make your Heavenly Twisted Cinnamon Rolls a true delight.
Importance of Allowing the Rolls to Rise a Second Time for Optimal Fluffiness
Once you’ve shaped your cinnamon rolls, it’s crucial to allow them to rise a second time before baking. This step is essential for achieving the light and airy texture that characterizes a perfect cinnamon roll. During this second rise, which usually takes about 30 to 45 minutes, the yeast will continue to ferment and produce carbon dioxide, causing the dough to expand.
To know when your rolls are ready for baking, gently poke one with your finger. If the indentation springs back slowly, they are ready. If it springs back too quickly, they need more time to rise. Proper rising ensures that your rolls will be fluffy and tender rather than dense and chewy.
Creating a Warm Environment for Rising
Creating a warm environment for your rolls to rise can significantly improve the fermentation process. Yeast thrives in warm temperatures, so here are a few tips to create the perfect rising environment:
1. Preheat Your Oven: Turn your oven to the lowest setting for just a few minutes, then turn it off. Place your covered rolls inside to rise in the residual warmth.
2. Use a Warm Spot in Your Kitchen: If it’s warm in your kitchen, placing the dough near a sunny window or on top of a warm appliance (like a refrigerator) can help.
3. Create a Humid Environment: Placing a bowl of hot water in the oven with the rolls can create a humid environment, which is beneficial for rising dough.
Baking to Perfection
Once your rolls have risen beautifully, it’s time to bake them. Preheat your oven to 375°F (190°C). This temperature helps the rolls rise further and develop a golden-brown crust.
Recommended Oven Temperature and Baking Time for Ideal Results
For these heavenly twisted cinnamon rolls, the ideal baking time is 20 to 25 minutes. However, every oven is different, so keep an eye on your rolls as they bake.
Visual Cues to Determine When the Rolls Are Done
To know when your cinnamon rolls are perfectly baked, look for a few key visual indicators:
– A rich golden-brown color.
– The rolls should have puffed up and expanded significantly.
– A toothpick inserted into the center should come out clean or with just a few crumbs attached.
Importance of Not Overbaking to Maintain a Soft Texture
Overbaking your rolls can lead to a dry, tough texture, which is the opposite of what you want. It’s crucial to remove them from the oven as soon as they are done baking. If you’re unsure, it’s better to check them a minute or two early than to risk overbaking.
Crafting the Cream Cheese Frosting
The crowning glory of any cinnamon roll is undoubtedly the cream cheese frosting. Here’s how to achieve the perfect consistency and flavor balance.
Step-by-Step Instructions for Achieving the Perfect Cream Cheese Frosting Consistency
1. Gather Your Ingredients: You will need 8 ounces of cream cheese (softened), 1/2 cup of unsalted butter (softened), 4 cups of powdered sugar, and 2 teaspoons of vanilla extract.
2. Blend the Cream Cheese and Butter: In a mixing bowl, use an electric mixer to blend the softened cream cheese and butter until smooth and creamy.
3. Add the Powdered Sugar: Gradually add the powdered sugar, mixing on low speed to avoid a sugar cloud. Once incorporated, increase the speed to combine thoroughly.
4. Mix in the Vanilla: Add the vanilla extract and mix until fully combined. If the frosting is too thick, you can add a tablespoon of milk to reach your desired consistency.
Discussion of Flavor Balancing in Frosting and How It Complements the Rolls
The cream cheese frosting should strike a balance between sweetness and tanginess. The tang of the cream cheese beautifully offsets the sweetness of the cinnamon rolls, enhancing the overall flavor experience. Adjust the sugar and cream cheese ratios to suit your personal taste preferences.
Tips on Spreading Frosting for a Visually Appealing Finish
For an aesthetically pleasing finish, allow your rolls to cool for about 10 minutes after baking before spreading the frosting. This prevents the frosting from melting into the rolls. Use an offset spatula or a butter knife to spread the frosting evenly over the top of the rolls, letting it cascade down the sides for a charming look.
Serving Suggestions and Pairings
Cinnamon rolls are incredibly versatile and can be enjoyed in various settings. Here are some serving suggestions to elevate your experience.
Ideas on How to Serve Cinnamon Rolls
– Breakfast Treat: Serve warm cinnamon rolls with a side of fresh fruit and a drizzle of maple syrup for a delightful breakfast spread.
– Decadent Dessert: Enjoy them as a dessert with a scoop of vanilla ice cream on the side for an indulgent treat.
– Brunch Favorite: Pair them with a selection of quiches and fresh salads for a delightful brunch spread.
Suggestions for Beverages That Pair Well with Cinnamon Rolls
Cinnamon rolls pair beautifully with a variety of beverages. Here are a few suggestions:
– Coffee: A classic pairing, coffee complements the sweetness and spiciness of the rolls.
– Tea: Enjoy with a cup of chai or a rich black tea to enhance the flavors of cinnamon.
– Milk: A cold glass of milk is a nostalgic and satisfying option, especially for those with a sweet tooth.
Presentation Tips to Enhance the Visual Appeal of the Dish
When serving your cinnamon rolls, consider these presentation tips:
– Platter Display: Arrange the rolls on a beautiful serving platter with a light dusting of powdered sugar on top for an elegant touch.
– Garnish: Fresh herbs like mint or edible flowers can add a pop of color and freshness to your presentation.
– Individual Servings: For an intimate gathering, serve individual rolls on small plates with a small bowl of frosting on the side for dipping.
Storing and Reheating Leftovers
Homemade cinnamon rolls are a treat, and it’s important to know how to store any leftovers properly to maintain their freshness.
Best Practices for Storing Leftover Cinnamon Rolls
Allow the cinnamon rolls to cool completely before storing them. Place them in an airtight container at room temperature for up to 2 days. If you need to store them longer, consider refrigerating them, where they can last for up to a week. For extended storage, you can freeze the rolls. Wrap each roll tightly in plastic wrap and place them in a freezer bag; they can last for up to 3 months.
Instructions on Reheating Rolls to Restore Their Soft Texture
To enjoy your cinnamon rolls again, reheat them gently:
1. If frozen, let them thaw in the refrigerator overnight.
2. Preheat your oven to 350°F (175°C).
3. Place the rolls on a baking sheet covered with aluminum foil to prevent them from drying out.
4. Heat for about 10-15 minutes, or until warmed through. You can also microwave individual rolls for about 20-30 seconds on a microwave-safe plate.
Discussion on the Longevity of the Dish and How to Enjoy Them Over Time
Cinnamon rolls can be a delightful treat for multiple days, whether enjoyed fresh, reheated, or transformed into other dishes. For instance, leftover rolls can be cubed and transformed into a delicious cinnamon roll bread pudding. This recipe showcases the versatility of your cinnamon rolls, making them a worthwhile endeavor to prepare in advance.
Conclusion
Making homemade cinnamon rolls is a rewarding experience that brings joy not only in the process but also in the delightful aroma that fills your kitchen and the satisfying taste that follows. As you knead the dough, watch it rise, and eventually bake these heavenly twisted rolls, you partake in a time-honored tradition that has been loved for generations.
Don’t hesitate to experiment with variations—try adding nuts, dried fruits, or even a chocolate swirl for a personal twist on this classic recipe. The joy of sharing these warm, gooey cinnamon rolls with family and friends is unparalleled, creating memories that will linger long after the last bite. So gather your loved ones, whip up a batch, and embrace the satisfaction of homemade goodness.
