Introduction
Fried chicken holds a special place in the hearts of many food enthusiasts, particularly in Southern cuisine, where it is celebrated for its rich flavors and satisfying crunch. The dish has become a staple at family gatherings, picnics, and restaurant menus across the United States and beyond. What makes fried chicken so beloved is not only its crispy exterior but also the tender, juicy meat that lies beneath. The secret to achieving that perfect balance of crunch and tenderness often comes down to one crucial element: buttermilk.
Marinating chicken in buttermilk is a time-honored technique that enhances both flavor and tenderness. The acidity in buttermilk breaks down the protein fibers of the chicken, resulting in a succulent texture that is second to none. This process not only infuses the meat with a slightly tangy flavor but also ensures that every bite is juicy and satisfying.
The appeal of crispy fried chicken extends beyond its taste. It is a versatile dish that can be served in various ways, from a classic meal with sides like coleslaw and cornbread to a gourmet sandwich topped with slaw and pickles. Whether you’re serving it for a Sunday dinner, a summer barbecue, or even as a late-night snack, buttermilk fried chicken is sure to please a crowd.
In this article, we will guide you through the process of creating extra crispy buttermilk fried chicken, focusing on the importance of each ingredient and the techniques that will lead to the ultimate fried chicken experience.
Understanding the Ingredients
To create the perfect extra crispy buttermilk fried chicken, it’s essential to understand the role of each ingredient involved in the recipe. From the marinade to the dredging mixture, every component contributes to the final result.
The Buttermilk Marinade
The marinade is the first step in achieving flavorful and juicy fried chicken. Here are the key ingredients you’ll need for the marinade:
– Buttermilk: This is the star of the marinade. Its acidity helps to tenderize the chicken while adding a subtle tangy flavor. Buttermilk also acts as an adhesive for the dredging mixture, allowing the flour and spices to stick to the chicken more effectively.
– Seasonings: The magic of fried chicken lies in its seasoning. Common spices to include in the marinade are salt, black pepper, garlic powder, and onion powder. These ingredients not only enhance the flavor of the chicken but also create a well-rounded taste profile.
– Hot Sauce (Optional): For those who enjoy a bit of heat, adding a dash of hot sauce to the marinade can elevate the flavor and provide a delightful kick.
The Dredging Mixture
Once the chicken has marinated, it’s time to prepare the dredging mixture, which is crucial for achieving that coveted crispy crust. Here are the main components:
– All-Purpose Flour: This is the primary ingredient in the dredging mixture. It forms the base of the coating and is responsible for creating the crunchy exterior. Using a high-quality all-purpose flour will yield the best results.
– Baking Powder: Adding baking powder to the flour mixture is a game-changer. It helps to create air pockets within the coating, resulting in a lighter and crispier texture. This is a secret trick that many chefs use to achieve that extra crunch.
– Paprika: This spice not only adds a beautiful color to the fried chicken but also contributes a subtle smokiness. You can choose between regular paprika or smoked paprika, depending on your flavor preference.
– Cayenne Pepper: For those who love a bit of heat, cayenne pepper can be added to the dredging mixture. It enhances the overall flavor profile, providing a nice balance to the richness of the fried chicken.
– Salt and Pepper: These basic seasonings are essential for enhancing the overall flavor of the dredging mixture. Be sure to season generously, as this will impact the taste of the final product.
Choosing the Right Oil for Frying
The choice of oil is another crucial factor when it comes to frying chicken. You want an oil that can withstand high temperatures without smoking or imparting undesirable flavors. Here are some of the best oils for frying:
– Peanut Oil: Known for its high smoke point (around 450°F or 232°C), peanut oil is a favorite among chefs for frying chicken. It has a neutral flavor that won’t interfere with the taste of the chicken.
– Canola Oil: Another excellent option, canola oil has a high smoke point (around 400°F or 204°C) and is widely available. It’s a budget-friendly choice that works well for frying.
– Vegetable Oil: Similar to canola oil, vegetable oil is a versatile and cost-effective option for frying. It has a high smoke point and a neutral flavor, making it suitable for various frying applications.
– Corn Oil: With a smoke point of around 450°F (232°C), corn oil is another reliable choice. It offers a slightly sweet flavor that can complement fried chicken nicely.
When frying chicken, it’s important to keep the oil at the right temperature. Too low, and the chicken will absorb excess oil, resulting in a greasy texture. Too high, and the coating may burn before the chicken is fully cooked. Maintaining an oil temperature between 325°F and 350°F (163°C to 177°C) is ideal for achieving that perfect golden brown crust.
The Marinade Process
Now that we’ve covered the ingredients, let’s dive into the marinade process. Marinating the chicken is a crucial step that infuses it with flavor and ensures a juicy final product.
Step-by-Step Breakdown of Creating the Marinade
1. Choose Your Chicken: Start with bone-in, skin-on chicken pieces for the best flavor and texture. You can use a mix of thighs, drumsticks, and breasts, depending on your preference.
2. Prepare the Marinade: In a large mixing bowl, combine the buttermilk with your chosen seasonings. This includes salt, black pepper, garlic powder, onion powder, and hot sauce if you’re using it. Whisk the mixture until well combined.
3. Add the Chicken: Place your chicken pieces into the marinade, ensuring each piece is fully submerged. If necessary, use a spatula to coat the chicken evenly.
4. Cover and Refrigerate: Once the chicken is fully coated, cover the bowl with plastic wrap or a lid and place it in the refrigerator. It’s recommended to marinate for at least 4 hours, but overnight is ideal for maximum flavor and tenderness.
5. Tips for Maximum Flavor: For maximum flavor infusion, consider flipping the chicken pieces halfway through the marinating process. This ensures that every piece gets equal exposure to the marinade.
Recommended Marinating Times
– Minimum Time: 4 hours
– Optimal Time: 8 to 12 hours
– Maximum Time: 24 hours (Avoid exceeding this time as the chicken may become too tender and mushy)
How Marinating Contributes to Juiciness
The marinating process not only infuses the chicken with flavor but also helps retain moisture during the frying process. As the chicken soaks in the buttermilk, it absorbs moisture, which translates to juiciness once cooked. The key is to allow enough time for the flavors to penetrate without compromising the texture.
In the next section, we will discuss preparing the dredging mixture, ensuring you have the perfect coating ready to create that extra crispy exterior. Stay tuned for more tips and step-by-step instructions to make your fried chicken experience unforgettable!

Dredging Process and Its Significance
The dredging process is a critical step in making your extra crispy buttermilk fried chicken. It not only creates a flavorful and crunchy coating but also ensures that the seasonings stick to the chicken, enhancing every bite. A well-executed dredging process helps seal in moisture while providing that irresistible crunch we all love.
Preparing the Dredging Mixture
To prepare the dredging mixture, begin with all-purpose flour as your base. Here’s a simple yet effective recipe for the dredging mixture:
– 2 cups all-purpose flour
– 1 tablespoon paprika (smoked or sweet, depending on your preference)
– 1 teaspoon garlic powder
– 1 teaspoon onion powder
– 1 teaspoon cayenne pepper (adjust to taste)
– 1 tablespoon salt
– 1 teaspoon black pepper
– 1 teaspoon baking powder (optional, for extra fluffiness)
1. In a large mixing bowl, combine all the dry ingredients thoroughly. This ensures an even distribution of flavors throughout the coating.
2. For added flavor, consider mixing in a pinch of dried herbs like thyme or oregano, or even a dash of your favorite hot sauce for a spicy kick.
Tips for Achieving an Even Coating on the Chicken
For an even coating, follow these tips:
– Dry Chicken: Make sure the chicken pieces are patted dry with paper towels. Excess moisture can lead to a soggy coating.
– Dredging Technique: When dredging, first dip each piece of chicken into the flour mixture, ensuring the entire surface is coated. Gently shake off any excess flour before moving to the next step.
– Double Dredging: For an extra thick and crunchy crust, consider double dredging. After the first coating, dip the chicken back into the buttermilk and then into the flour mixture again.
– Rest Before Frying: Let the dredged chicken rest on a wire rack for about 10-15 minutes. This allows the coating to adhere better during frying.
Frying Techniques for Perfectly Crispy Chicken
Achieving perfectly crispy buttermilk fried chicken relies on a few key frying techniques, including maintaining the right oil temperature, using the right equipment, and frying the chicken without overcrowding.
Importance of Oil Temperature and How to Achieve It
The ideal frying temperature for chicken is between 325°F to 350°F (163°C to 177°C). If the oil is too hot, the exterior will brown too quickly while the inside remains undercooked. If it’s too cool, the chicken will absorb excess oil and become greasy.
To monitor the oil temperature:
– Use a deep-fry thermometer to get an accurate reading.
– If you don’t have a thermometer, drop a small piece of bread into the oil. If it browns in about 60 seconds, the oil is ready for frying.
Recommended Frying Equipment
Choosing the right frying equipment is essential for achieving that crispy texture:
– Heavy-Bottomed Skillet: A cast-iron skillet is ideal for frying chicken as it distributes heat evenly and retains temperature well.
– Dutch Oven: A Dutch oven is also a great option, providing deeper oil for frying and reducing the risk of splattering.
Step-by-Step Guide on Frying Chicken Without Overcrowding
1. Heat the Oil: Pour enough oil into your skillet or Dutch oven to reach a depth of about 2-3 inches. Heat over medium-high heat.
2. Test the Oil: Once the oil reaches the desired temperature, carefully add a few pieces of chicken. Avoid overcrowding the pan, as this lowers the oil temperature and results in uneven cooking.
3. Fry in Batches: Fry the chicken in batches, allowing for a little space between pieces to ensure they cook evenly and develop that golden-brown crust. This typically takes about 12-15 minutes per batch, depending on the size of the pieces.
Discussion on Cooking Times for Different Chicken Pieces
Cooking times will vary depending on the cut of chicken you are frying:
– Bone-in Chicken Breasts: Approximately 12-15 minutes per side.
– Thighs and Drumsticks: Around 10-12 minutes per side.
– Wings: About 8-10 minutes per side.
Always check for doneness by ensuring the internal temperature reaches 165°F (74°C).
How to Check for Doneness with a Meat Thermometer
To ensure your chicken is perfectly cooked:
– Insert a meat thermometer into the thickest part of the chicken, avoiding bone.
– Once it reaches 165°F (74°C), it is safe to eat. If the temperature is lower, continue frying and check again after a few minutes.
Draining and Resting the Chicken
Once the chicken is golden brown and crispy, it’s essential to drain excess oil to maintain that coveted crispiness.
Importance of Draining Excess Oil
– Use a Wire Rack: After frying, place the chicken pieces on a wire rack set over a baking sheet. This allows air to circulate around the chicken, preventing it from steaming and losing its crispiness.
– Avoid Paper Towels: While it may be tempting to place the fried chicken on paper towels, this can lead to a soggy bottom.
How Resting the Chicken Affects Texture and Flavor
Resting is a crucial step often overlooked. Allow the fried chicken to rest for at least 10 minutes:
– This resting period helps the juices redistribute throughout the meat, resulting in a juicier bite.
– It also allows the crust to firm up, ensuring that it remains crispy when served.
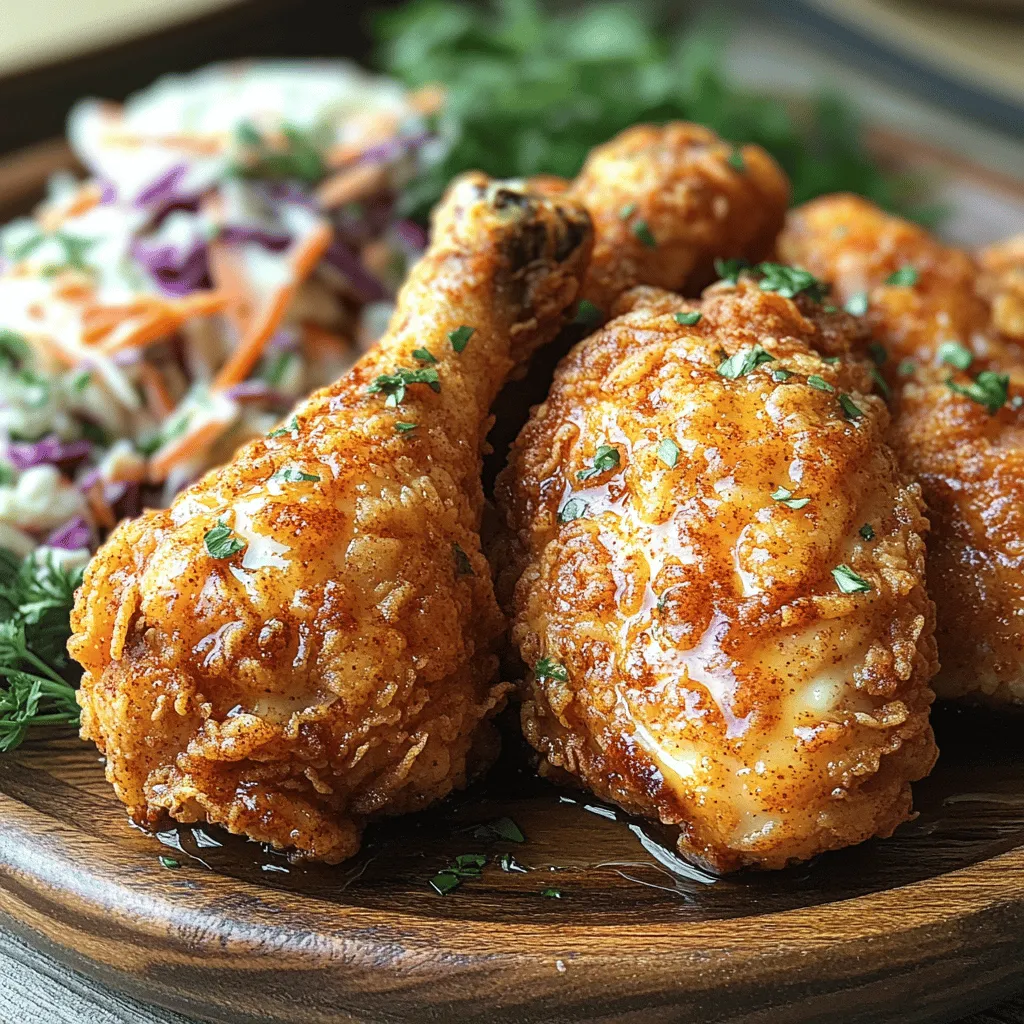
Presentation Tips for Serving Perfectly Fried Chicken
Presentation can elevate your fried chicken experience:
– Serve the chicken on a large platter, garnished with fresh herbs like parsley or thyme for a pop of color.
– You can also use parchment paper for a rustic look or line the platter with fresh greens to add vibrancy.
Serving Suggestions
Fried chicken pairs beautifully with a variety of side dishes and accompaniments. Here are some ideas to elevate your meal:
Ideas for Side Dishes
1. Classic Coleslaw: The crunch and creaminess of coleslaw offer a refreshing contrast to the crispy chicken.
2. Biscuits: Fluffy, buttery biscuits are perfect for soaking up any juices and complement the chicken beautifully.
3. Cornbread: Sweet and savory cornbread adds a comforting touch to your meal.
4. Green Beans or Collard Greens: These greens provide a nutritious balance and a Southern flair to your fried chicken plate.
Discussion on Sauces and Dips
Enhance your fried chicken experience with delightful sauces:
– Honey: A drizzle of honey adds sweetness that pairs wonderfully with the savory chicken.
– Hot Sauce: For those who appreciate heat, a side of hot sauce can bring an exciting kick.
– Buttermilk Ranch Dressing: Creamy ranch dressing serves as a great dip, adding coolness to the crispy chicken.
Conclusion
In summary, achieving extra crispy buttermilk fried chicken is a delightful culinary adventure that requires attention to detail throughout the process. By mastering the dredging technique, maintaining proper oil temperature, and allowing the chicken to rest, you can create a dish that is not only delicious but also visually appealing.
We encourage you to try this recipe at home for a satisfying meal that will impress family and friends alike. Homemade fried chicken brings a sense of joy and comfort, making it a perfect centerpiece for family gatherings, picnics, or special occasions. Enjoy the satisfaction of serving your loved ones a dish that is as rewarding to make as it is to eat.
