Introduction
Apple pie is more than just a dessert; it’s a symbol of home, warmth, and family gatherings in American culture. This iconic dish has woven itself into the fabric of our celebrations, from Thanksgiving dinners to holiday feasts, serving as a sweet testament to tradition that transcends generations. The phrase “as American as apple pie” perfectly encapsulates its revered status, embodying the essence of comfort food that brings people together.
Among the many variations of apple pie, Grandma’s Classic Apple Pie remains a cherished family heirloom, passed down through the years, each generation adding its own touch while preserving the original spirit of the recipe. This pie evokes memories of warm kitchens filled with the sweet scent of baking apples and spices, reminding us of the love and care that goes into making it. The combination of tender, tart apples enveloped in a flaky crust creates a nostalgic experience that no store-bought pie can replicate.
In this article, we will unveil the secrets behind Grandma’s Classic Apple Pie, exploring the significance of each ingredient, and providing you with step-by-step instructions to create this timeless dessert in your own kitchen. Get ready to dive into an experience that will not only satisfy your sweet tooth but also connect you to the rich legacy of family cooking.
Understanding the Ingredients
Every great apple pie begins with quality ingredients that play crucial roles in achieving the perfect balance of flavors and textures. Here’s a closer look at the key components that make Grandma’s Classic Apple Pie a standout.
Granny Smith Apples: The Ideal Choice
When it comes to selecting apples for your pie, Granny Smith apples are often regarded as the gold standard. Their tartness provides a refreshing contrast to the sweetness of the sugar and spices, while their firm texture holds up beautifully during baking. This variety not only adds depth to the flavor profile but also ensures that the filling does not become mushy, resulting in a pie that is both flavorful and texturally pleasing.
Lemon Juice: A Touch of Acidity
Adding lemon juice to the apple mixture is a crucial step that brings a bright acidity to the filling. This acidity helps to balance the sweetness of the apples and sugar, enhancing the overall flavor of the pie. Moreover, lemon juice plays a role in preventing the apples from browning too quickly, keeping your filling vibrant and appealing.
Spices: The Magic of Cinnamon and Nutmeg
No classic apple pie would be complete without the warm, comforting spices of cinnamon and nutmeg. Cinnamon enhances the natural sweetness of the apples while adding a distinctive warmth that makes the pie irresistible. Nutmeg, used sparingly, lends a subtle depth of flavor that rounds out the spice profile. Together, these spices create an aromatic experience that evokes feelings of nostalgia and warmth.
Sugar: Balancing Sweetness and Tartness
Sugar is essential for sweetening the pie, but the key is to find the right balance. Too much sugar can overwhelm the natural tartness of the apples, while too little can leave the pie tasting bland. For Grandma’s Classic Apple Pie, a combination of granulated sugar and brown sugar is often used. Granulated sugar provides straightforward sweetness, while brown sugar adds a hint of caramel flavor and moisture to the filling.
Flour: Thickening the Filling
Flour serves a critical function in the pie filling, acting as a thickening agent that helps to absorb excess moisture released by the apples during baking. This ensures that the filling is not runny, providing a pleasant texture that complements the flaky crust. A mixture of all-purpose flour and a bit of cornstarch can enhance the thickening power without altering the flavor.
Pie Crusts: Store-Bought vs. Homemade
The choice between using a store-bought pie crust or making one from scratch can greatly influence the final result of your pie. Store-bought options offer convenience and can yield decent results, but nothing compares to the flaky, buttery texture of a homemade crust. Making your own pie crust allows you to control the ingredients and achieve a level of freshness that is hard to match. If you choose to go the homemade route, the effort will be well worth it, creating a pie that is truly special.
Step-by-Step Instructions for Grandma’s Classic Apple Pie
Now that we’ve covered the essential ingredients, let’s dive into the process of making Grandma’s Classic Apple Pie. Follow these step-by-step instructions to create a pie that will delight your family and friends, bringing a taste of nostalgia to your table.
Preparing the Apples
The first step in making your apple pie is to prepare the apples. Begin by gathering your Granny Smith apples and following these steps:
1. Peeling: Use a vegetable peeler to carefully remove the skin from each apple. Take your time to ensure that you don’t remove too much flesh along with the skin, as you want the maximum amount of fruit for your filling.
2. Corering: Once peeled, use an apple corer or a knife to remove the core from each apple. This step is essential as the core contains seeds that can affect the texture and taste of your pie.
3. Slicing: After coring, slice the apples into thin, even pieces. Aim for about 1/4-inch thick slices to ensure even cooking. This uniformity will help the apples cook at the same rate, resulting in a harmonious filling.
4. Letting the Mixture Sit: Place the sliced apples in a large bowl and sprinkle them with lemon juice, sugar, cinnamon, and nutmeg. Toss the mixture gently to coat the apples evenly. Allow the apple mixture to sit for about 15-30 minutes. This resting period is crucial as it allows the flavors to meld and the apples to release some of their juices, which will ultimately enhance the filling.
Preheating the Oven
While the apple mixture is resting, it’s time to preheat your oven. Preheating is an essential step in baking that ensures even cooking and helps to create that beautifully golden crust. Set your oven to 425°F (220°C) and allow it to heat up fully before placing the pie inside. This process helps to achieve that perfect flaky texture we all love in a pie crust.
Preparing the Pie Crust
Creating the pie crust can be a rewarding experience. Whether you choose to make your own or use a store-bought option, here’s how to prepare the crust:
1. Rolling Out the Dough: If you’re making your own pie crust, roll out the dough on a lightly floured surface. Start from the center and work your way outwards, turning the dough frequently to maintain an even thickness. Aim for a circle that is about 12 inches in diameter.
2. Fitting the Crust into the Pie Plate: Carefully transfer the rolled-out dough to your pie plate. You can do this by rolling the dough around your rolling pin and then unrolling it over the plate. Gently press the dough into the bottom and sides of the plate, ensuring there are no air bubbles.
3. Trimming and Crimping the Edges: Once the crust is fitted, use a sharp knife to trim any excess dough that hangs over the edge of the pie plate. Leave about a 1-inch overhang, which you can fold under itself for a thicker edge. To create a professional look, crimp the edges using your fingers or a fork, making sure it’s sealed well to hold the filling.
Filling the Pie
With your apples prepared and crust ready, it’s time to fill your pie. Here’s how to properly layer the apple mixture into the crust:
1. Layering the Apples: Start by spooning the apple mixture into the prepared pie crust. Distribute the apples evenly, stacking them slightly to create height. This will help create a beautiful presentation when the pie is baked.
2. Topping the Filling: If desired, you can sprinkle some additional cinnamon and a pat of butter over the apple filling. This adds extra richness and flavor during baking.
3. Covering the Pie: If you have prepared a top crust, roll it out just like the bottom crust and place it over the filled pie. Cut several slits in the top to allow steam to escape during baking. If you prefer a rustic look, you can leave it open-faced or create a lattice pattern with strips of dough.
Now that your pie is filled and ready to go, it’s time to bake it to perfection. The process of baking will be discussed in the next part of the article, where we will delve into the baking time, tips for achieving the perfect crust color, and how to let your pie cool to enhance the flavors even further. Stay tuned for more insights into this beloved classic, and prepare to impress your family and friends with Grandma’s Classic Apple Pie!
Dotting with Butter for Added Richness
One of the secrets to elevating Grandma’s Classic Apple Pie is the simple yet effective technique of dotting the filling with butter. As the pie bakes, the butter melts, enriching the filling and creating a delightful moisture that enhances the flavors of the apples and spices. This step not only contributes to the overall richness of the pie but also ensures that the filling doesn’t dry out during the baking process. A few small pieces of butter distributed evenly over the top of the apple mixture can make a significant difference in the final outcome, providing that sought-after luscious bite that keeps everyone coming back for more.
Topping the Pie
When it comes to the appearance and texture of your pie, the topping plays a crucial role. You have a couple of options for covering the pie: a full crust or a lattice design.
Full Crust vs. Lattice Design
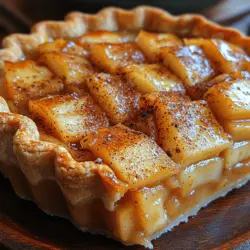
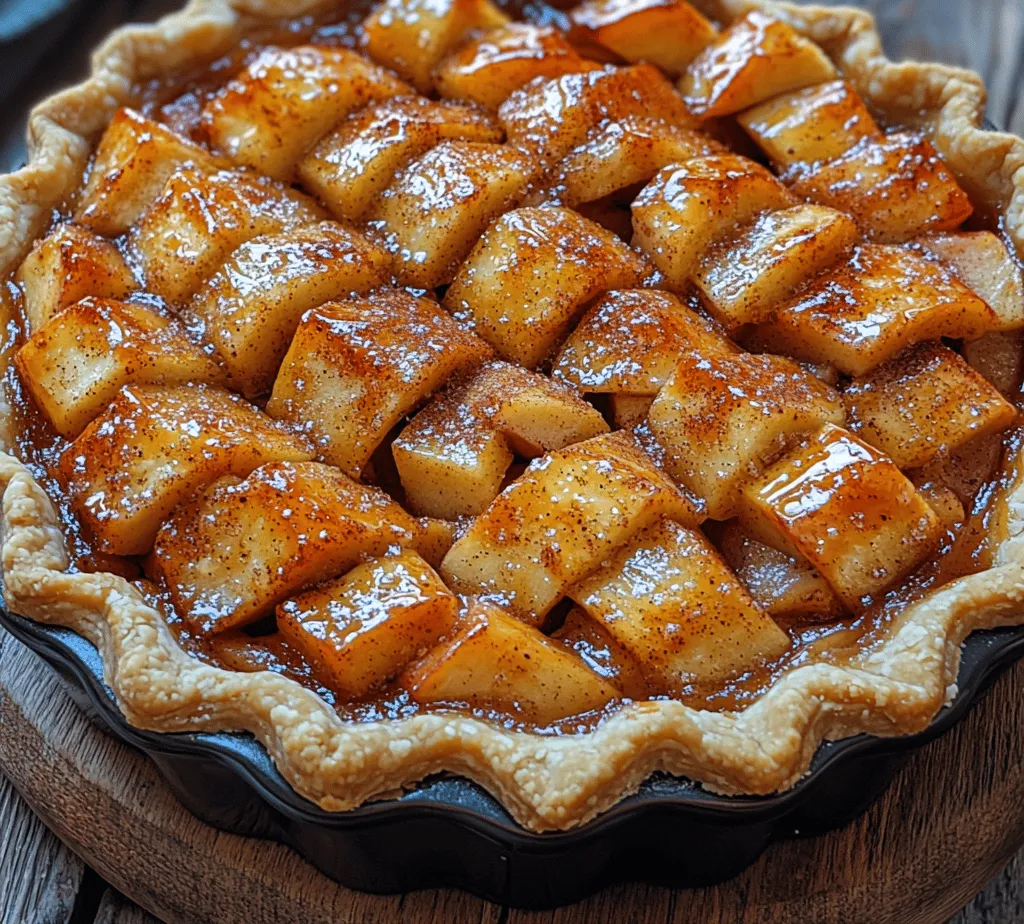
A full crust is the classic choice, creating a beautifully golden exterior that encases the delicious apple filling. However, opting for a lattice design not only adds a touch of elegance but also allows steam to escape during baking, which can help prevent a soggy bottom crust. The lattice top gives a glimpse of the spiced apples beneath and can be an impressive centerpiece for any gathering.
If you choose the lattice design, here’s how to do it:
1. Roll Out the Dough: After rolling out the second half of your pie dough, cut it into strips about ¾ inch wide.
2. Weave the Strips: Lay half of the strips parallel across the top of the pie. Fold back every other strip to create a space to weave the remaining strips through. Alternate folding the strips back down as you go, forming a crisscross pattern.
3. Trim and Seal: Once your lattice is complete, trim the edges of the strips and fold them under the edge of the bottom crust. Crimp to seal the edges securely.
Applying the Egg Wash
An essential step in achieving that perfect golden crust is the application of an egg wash. This simple mixture of beaten egg and a splash of water or milk creates a glossy finish that not only looks appealing but also enhances the pie’s texture.
1. Prepare the Egg Wash: In a small bowl, whisk together one egg with a tablespoon of water or milk until fully combined.
2. Brush the Pie: Using a pastry brush, gently apply the egg wash over the crust, taking care not to let it drip onto the pie filling. This will help create a beautiful shine once baked.
For an extra touch of sweetness and texture, sprinkle coarse sugar over the top of the pie after applying the egg wash. This will caramelize as it bakes, adding a delightful crunch to each slice.
Baking the Pie
Now that your pie is fully assembled and ready to go, it’s time to bake it to perfection.
Optimal Baking Conditions
Preheat your oven to 425°F (220°C) to ensure that the crust starts cooking immediately upon entering the oven. Place your pie on a baking sheet lined with parchment to catch any drips that may occur during baking.
Bake the pie for about 15-20 minutes at this high temperature. This initial blast of heat will help the crust achieve that desirable flaky texture. After this time, reduce the oven temperature to 350°F (175°C) and continue baking for an additional 30-40 minutes. The pie is done when the crust is golden brown, and the filling is bubbling through the lattice or crust.
Tips for Edge Protection
To prevent the edges of your pie from browning too quickly, consider using a pie shield or aluminum foil. Simply cover the edges of the pie with foil after the first 15 minutes of baking, and remove it during the last 10 minutes to allow the edges to crisp up without burning.
Cooling and Serving the Pie
Once baked, it’s crucial to let your apple pie cool before slicing. Cooling allows the filling to set, preventing the juices from running out when you cut into it. Ideally, let your pie cool for at least two hours at room temperature.
Suggestions for Serving
When it comes time to serve, consider pairing your warm apple pie with a scoop of vanilla ice cream, which is a classic combination. The creamy texture of the ice cream complements the warm spices and sweet-tart apples beautifully. A dollop of freshly whipped cream or a drizzle of caramel sauce can also enhance the experience, adding richness and a touch of decadence.
The Legacy of Apple Pie
Apple pie holds a special place in American culture, often associated with home and family gatherings. The phrase “as American as apple pie” underscores its significance as a symbol of comfort and tradition. This dessert has graced countless tables during holidays, family reunions, and celebrations, embodying the warmth of shared memories and love.
Famous figures have often praised apple pie, weaving it into the fabric of American folklore. For instance, President Franklin D. Roosevelt famously stated, “The only thing we have to fear is fear itself… and not having enough apple pie.” Such sentiments reflect how deeply ingrained this dessert is in the American psyche, representing not just a delicious treat but also the comfort of home.
Variations on Grandma’s Classic Apple Pie
While Grandma’s Classic Apple Pie is a timeless masterpiece, there’s always room for creativity. Here are some ideas for customizing the recipe to suit your taste preferences:
– Spice It Up: Consider adding different spices such as ginger or cloves to the apple mixture for a unique flavor profile. These spices can add warmth and depth, making your pie stand out.
– Explore Apple Varieties: Experiment with different types of apples for varied flavors and textures. Granny Smith apples provide a tartness that balances sweetness, while Honeycrisp apples offer a crisp bite. A blend of apples can yield a more complex flavor.
– Add a Twist: For a unique twist, introduce caramel or raisins to the filling. The caramel will add richness, while raisins provide a chewy texture that complements the softness of the apples.
Conclusion
Grandma’s Classic Apple Pie is more than just a dessert; it’s a cherished recipe that evokes memories of family gatherings and celebrations. The combination of sweet-tart apples, warm spices, and a flaky crust creates a timeless treat that never fails to bring joy. Baking this pie not only fills your home with the delightful aroma of apples and cinnamon but also provides an opportunity to create new memories with loved ones.
As you embark on your journey to make this classic recipe, remember that the essence of baking lies in the love and care you put into it. Encourage your family to join you in the kitchen, sharing stories and laughter as you prepare this beloved dessert. With every slice of this apple pie, you’re not just serving a delicious treat; you’re passing down a legacy of love, warmth, and togetherness. So preheat that oven, gather your ingredients, and start baking—your adventure with Grandma’s Classic Apple Pie awaits!