Introduction
Indulging in a decadent dessert doesn’t always require a long baking process. Enter the No-Bake Oreo Cheesecake Bars—a delightful combination of creamy cheesecake and crunchy Oreo cookies that will satisfy your sweet tooth without the need for an oven. This easy-to-follow recipe is perfect for gatherings, special occasions, or simply treating yourself. With a smooth filling and a rich crust, these bars are guaranteed to impress friends and family alike. In this article, we will explore the detailed preparation of this delicious treat, the science behind its ingredients, and tips for achieving the perfect dessert.
Understanding the No-Bake Cheesecake Trend
In recent years, no-bake desserts have surged in popularity among home bakers and dessert enthusiasts alike. This trend is largely driven by the appeal of simplicity and convenience. No-bake recipes allow people to create delicious treats without the added time and effort of preheating an oven or managing complex baking processes. This is particularly enticing for those who may not have extensive baking skills or simply prefer to avoid the heat of the kitchen during warmer months.
One significant advantage of no-bake cheesecakes over traditional baked versions is their texture. No-bake cheesecakes are typically creamier and denser, providing a velvety mouthfeel that pairs beautifully with the crunch of cookies like Oreos. Furthermore, the absence of baking means that the risk of overcooking or drying out the cheesecake is eliminated, resulting in a consistently rich and satisfying dessert.
No-bake recipes also align perfectly with modern culinary trends that prioritize convenience and flavor. As more people seek quick and achievable dessert solutions, recipes like the No-Bake Oreo Cheesecake Bars become go-to options for busy lifestyles. This dessert not only satisfies cravings but also caters to a range of dietary preferences and occasions, making it a versatile choice for any gathering.
Ingredients Breakdown
To create the ultimate No-Bake Oreo Cheesecake Bars, it’s crucial to understand the role of each ingredient in the recipe. Below, we break down the key components that contribute to the dessert’s deliciousness and texture.
Key Ingredients for the Crust
– Oreo Cookies: The star of the dessert, Oreo cookies provide the signature flavor and texture that makes this cheesecake stand out. Their chocolatey crunch creates a perfect base for the creamy filling, delivering a delightful contrast in every bite.
– Unsalted Butter: This ingredient acts as the binding agent that holds the crust together. By melting the butter and combining it with crushed Oreo cookies, you create a cohesive mixture that can be easily pressed into the baking dish. Using unsalted butter allows for better control over the saltiness of the dessert, ensuring that the flavors remain balanced.
Essential Ingredients for the Cheesecake Filling
– Cream Cheese: The base of the cheesecake, cream cheese provides the rich and creamy texture that is essential for a successful cheesecake. It’s important to use full-fat cream cheese for the best flavor and consistency. Ensure it’s softened to room temperature for easy mixing and a smooth filling.
– Granulated Sugar: This ingredient adds sweetness and a touch of balance to the rich cream cheese. The sugar not only sweetens the filling but also helps stabilize the mixture, ensuring that it sets properly when chilled.
– Vanilla Extract: A dash of vanilla extract enhances the flavor depth of the cheesecake filling, adding a warm, aromatic note that complements the chocolate of the Oreos. Using pure vanilla extract rather than imitation will yield the best flavor results.
– Heavy Whipping Cream: This is the secret to achieving a light and airy texture in the cheesecake filling. When whipped, heavy cream adds volume and a luxurious mouthfeel. It’s important to whip the cream to soft peaks before folding it into the cream cheese mixture to ensure that your cheesecake bars have the perfect consistency.
– Chopped Oreos: Adding chopped Oreos to the filling not only enhances the flavor but also contributes texture, allowing you to enjoy bits of the cookie in every single bite of cheesecake.
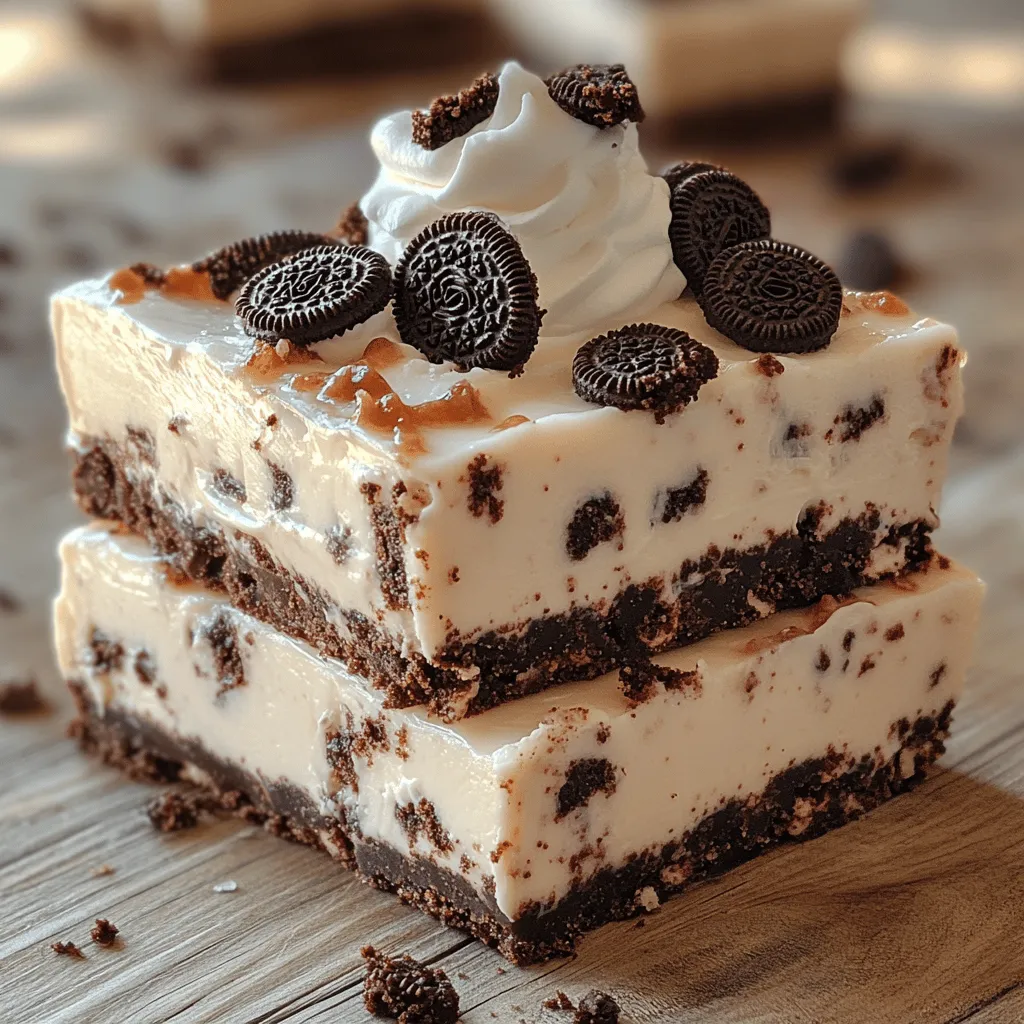
Optional Garnishes to Elevate Presentation
– Additional Oreo Cookies: For topping and decoration, additional Oreo cookies can be crushed or placed whole on top of the cheesecake bars. This not only enhances the visual appeal but also adds an extra crunch.
– Whipped Cream: A classic finishing touch, whipped cream can be piped onto the cheesecake bars for an elegant presentation. It adds a fluffy contrast to the dense filling and can be sweetened slightly for extra flavor.
Step-by-Step Preparation of No-Bake Oreo Cheesecake Bars
Crafting the perfect No-Bake Oreo Cheesecake Bars is a straightforward process that anyone can master. Below are the detailed steps to guide you through making this delicious dessert.
Crafting the Perfect Oreo Crust
1. Mixing and Pressing the Crust Mixture:
Start by gathering your ingredients for the crust. In a food processor, pulse the Oreo cookies until they are finely crushed. Alternatively, you can place the cookies in a resealable plastic bag and crush them with a rolling pin. Once you have a fine crumb, transfer it to a mixing bowl and combine it with melted unsalted butter. Mix until the crumbs are well coated and resemble wet sand.
Next, pour the crust mixture into a lined 9×9-inch baking dish. Using the back of a measuring cup or your hands, press the mixture firmly into an even layer across the bottom of the dish. Make sure to pack it tightly to create a sturdy base that will hold the cheesecake filling.
2. Importance of Chilling the Crust Before Adding the Filling:
Once the crust is pressed into the dish, place it in the refrigerator to chill for about 10-15 minutes. This step is crucial as it allows the butter to set, ensuring that the crust maintains its shape when you add the filling. Chilling the crust also helps enhance the overall texture of the dessert, providing a satisfying crunch that contrasts beautifully with the creamy cheesecake.
Creating the Creamy Cheesecake Filling
After your crust has chilled and set, it’s time to prepare the creamy cheesecake filling.
1. Softening the Cream Cheese:
Begin by ensuring that your cream cheese is at room temperature, as this will make it much easier to blend. In a large mixing bowl, beat the softened cream cheese with a hand mixer or stand mixer until it is smooth and free of lumps.
2. Incorporating Sugar and Vanilla:
Once the cream cheese is smooth, gradually add the granulated sugar and vanilla extract. Mix until well combined, scraping down the sides of the bowl as necessary. The mixture should be creamy and well-blended, with no visible lumps of cream cheese remaining.
3. Whipping the Heavy Cream:
In a separate bowl, whip the heavy whipping cream until soft peaks form. This is a critical step for achieving the light and airy texture of your cheesecake. Be careful not to over-whip, as this can lead to a grainy texture.
4. Folding in the Whipped Cream and Chopped Oreos:
Gently fold the whipped cream into the cream cheese mixture using a spatula. It’s important to do this carefully to maintain the airiness of the whipped cream. Once combined, fold in the chopped Oreo cookies to distribute them evenly throughout the filling.
With these steps, you will have a luscious cheesecake filling ready to be spread over your chilled crust. Stay tuned as we continue with the assembly and final touches to make these No-Bake Oreo Cheesecake Bars truly unforgettable.

Beating the Cream Cheese for a Smooth Consistency
To achieve the perfect texture for your No-Bake Oreo Cheesecake Bars, the first step involves properly beating the cream cheese. Start with softened cream cheese—it’s crucial that it reaches room temperature to avoid lumps. Place the cream cheese in a large mixing bowl and use an electric mixer on medium speed. Beat it for about 2-3 minutes until it becomes creamy and smooth. This process not only enhances the texture but also prepares the foundation for your cheesecake filling.
The Role of Sugar and Vanilla in Flavor Enhancement
Once your cream cheese is smooth, it’s time to incorporate the sugar and vanilla extract. Adding sugar is vital, as it balances the tanginess of the cream cheese, while vanilla extract brings warmth and depth to the flavor profile. Gradually add in the granulated sugar, mixing on low speed to avoid sugar clouds. After the sugar is incorporated, add in 1 teaspoon of pure vanilla extract. Mix until fully combined, ensuring the mixture is not only smooth but also deliciously flavorful.
Whipping Cream to Perfection
The whipped cream is the secret to the light and airy texture of your cheesecake bars. Start with cold heavy cream, pouring it into a separate mixing bowl. Using a clean electric mixer or a whisk, whip the cream on medium-high speed.
Understanding the Technique for Achieving Stiff Peaks
Whipping cream requires vigilance. Continue whipping until you reach stiff peaks, which means that when you lift the beaters out of the bowl, the cream holds its shape without drooping. This process typically takes about 3-5 minutes. Be careful not to over-whip, as this can lead to butter forming.
The Importance of Folding in the Whipped Cream Gently
Once your whipped cream has reached the right consistency, it’s time to fold it into your cream cheese mixture. This step is crucial—gently fold the whipped cream using a spatula or large spoon, ensuring you maintain the airiness. Start by adding a small amount of whipped cream to lighten the cream cheese mixture, then gradually fold in the remaining whipped cream. This technique ensures you keep the light, fluffy texture that makes no-bake cheesecakes so delightful.
Incorporating Chopped Oreos into the Filling
After your cream cheese and whipped cream are combined, it’s time to add the star ingredient—chopped Oreos. Using a sharp knife or a food processor, chop the Oreos into bite-sized pieces. You want to retain some texture, so avoid pulverizing them into dust.
Tips for Evenly Distributing the Cookies for Flavor in Every Bite
Once chopped, gently fold the Oreos into the cheesecake filling. This will not only distribute the chocolate cookie flavor throughout the filling but also create a beautiful visual contrast against the creamy mixture. Make sure the pieces are evenly distributed so that every bite of your cheesecake bars is packed with delightful Oreo goodness.
Layering and Setting the Cheesecake
Now that your filling is ready, it’s time to layer it over the crust.
Pouring and Smoothing the Filling Over the Crust
Take your prepared Oreo crust from the refrigerator, ensuring it has set slightly. Pour the creamy cheesecake filling over the crust, using a spatula to smooth it out evenly. The goal is to create a flat surface that will yield clean cuts once the bars are fully set.
The Significance of Chilling Time for Optimal Texture
After smoothing the filling, cover the pan with plastic wrap and place it in the refrigerator. The chilling time is paramount—allow the cheesecake bars to set for at least 4 hours, but overnight is preferable. This time allows the flavors to meld and the filling to firm up, creating those perfect, sliceable bars you crave.
Serving Suggestions
When it comes to serving your No-Bake Oreo Cheesecake Bars, presentation can elevate your dessert to the next level.
Creative Serving Ideas for Gatherings
Consider cutting the cheesecake into squares or rectangles, and place them on a decorative platter for a beautiful display. Garnish with additional chopped Oreos or a drizzle of chocolate sauce for added flair. For a more casual gathering, serve them directly in the baking dish with a few spoons nearby, allowing guests to help themselves.
Pairing with Complementary Desserts or Beverages
These cheesecake bars pair wonderfully with a variety of desserts and beverages. A scoop of vanilla ice cream or a dollop of whipped cream complements the rich flavors of the cheesecake. For beverages, consider serving with coffee, milk, or a sweet dessert wine to enhance the overall tasting experience.
Nutritional Information
Understanding the nutritional content of your dessert can be helpful, especially if you’re mindful of dietary choices.
Caloric Breakdown Per Serving
One serving of No-Bake Oreo Cheesecake Bars (approximately 1 square, based on a 9×9 pan cut into 16 squares) contains about 250-300 calories. This includes contributions from the cream cheese, sugar, and Oreos, making it a decadent treat.
Comparisons to Traditional Baked Cheesecakes
Compared to traditional baked cheesecakes, which often have a richer, denser texture, no-bake versions typically contain less fat and fewer calories per serving. This makes the No-Bake Oreo Cheesecake Bars a more approachable dessert option without sacrificing flavor or indulgence.
Common Variations and Customizations
The beauty of No-Bake Oreo Cheesecake Bars lies in their versatility.
Exploring Alternative Flavors and Mix-Ins
Feel free to experiment with different flavors and mix-ins. Instead of Oreos, you could use other cookies like peanut butter cookies, chocolate chip cookies, or even ginger snaps for a spicy twist. For a fruitier version, consider folding in crushed strawberries or raspberries into the filling.
Different Cookie Options for the Crust
While the classic Oreo crust is beloved, you can switch it up by using graham crackers, shortbread cookies, or even gluten-free cookies to accommodate dietary preferences. Each option can bring a unique flavor profile to your cheesecake bars.
Flavor Variations for the Cheesecake Filling
For those looking to add a flavor twist, consider adding cocoa powder for a chocolate version, or lemon zest for a refreshing citrus flavor. These small adjustments can create a completely different dessert experience.
Incorporating Seasonal Ingredients for Unique Twists
Incorporating seasonal ingredients can also make your cheesecake bars stand out. For example, adding pumpkin puree and spices in the fall can create an autumn-inspired treat, while fresh berries in the summer can provide a light and fruity option.
Conclusion
No-Bake Oreo Cheesecake Bars exemplify how simple ingredients can create a stunning dessert that caters to both the eyes and the palate. This recipe not only provides a quick and easy solution for dessert lovers but also highlights the versatility of no-bake cheesecakes. Whether you’re hosting a party or enjoying a quiet night in, these bars are sure to be a crowd-pleaser. With just a few steps and some patience during the chilling process, you can enjoy a slice of creamy, crunchy bliss that brings joy to any occasion.
