Introduction
If you’re on the lookout for a nutritious yet delightful snack, look no further than Nutty Bliss Jelly Bars. These bars are perfect for busy families, kids, and anyone seeking a wholesome treat that satisfies both hunger and a sweet tooth. With a harmonious blend of rolled oats, creamy peanut butter, and your choice of fruit jam, Nutty Bliss Jelly Bars not only tantalize your taste buds but also deliver a punch of nutrition. They are easy to make, can be stored for later, and are a fantastic way to incorporate whole ingredients into your diet.
The beauty of these bars lies in their versatility. You can tailor them to your taste preferences by choosing different types of fruit jams, nuts, or even spices. Whether you serve them as an after-school snack, a post-workout boost, or a dessert, they are sure to become a family favorite. Let’s dive into the components that make these bars not only delicious but also a wholesome choice for anyone looking to indulge without the guilt.
Understanding the Ingredients
To appreciate the Nutty Bliss Jelly Bars fully, it’s important to understand the role each ingredient plays in this recipe. Here’s a detailed breakdown:
Rolled Oats
Rolled oats serve as the foundation of these bars, contributing both nutritional value and texture. Oats are rich in fiber, which helps promote digestion and keeps you feeling full longer. They are also a good source of essential vitamins and minerals, including iron and magnesium. The texture of rolled oats adds a delightful chewiness to the bars, making each bite satisfying and hearty.
All-Purpose Flour
All-purpose flour is essential for providing structure to the Nutty Bliss Jelly Bars. It helps bind the ingredients together, contributing to the overall crumb and texture. While the oats offer a chewy base, the all-purpose flour ensures that the bars have a soft and manageable consistency. This balance is crucial for creating a bar that holds together well yet is easy to bite into.
Baking Soda and Salt
Baking soda is a vital leavening agent in this recipe, helping the bars rise slightly during baking. It also plays a role in enhancing the flavors of the other ingredients. On the other hand, a pinch of salt brings out the natural sweetness of the bars and balances the rich flavors of peanut butter and jam. Together, these ingredients contribute to a well-rounded taste profile.
Brown Sugar
Brown sugar not only adds sweetness to the Nutty Bliss Jelly Bars but also contributes to their moisture and richness. The molasses present in brown sugar gives the bars a deeper flavor and a slightly chewy texture. This ingredient helps to create a satisfying contrast to the nutty and fruity elements, making each bite indulgent yet wholesome.
Unsalted Butter
Unsalted butter brings richness and flavor to the bars, enhancing their overall taste and texture. The fat content in butter helps to create a tender crumb, while also providing a satisfying mouthfeel. If you prefer a dairy-free option, you can substitute the butter with coconut oil or a vegan butter alternative, maintaining the deliciousness while catering to dietary preferences.
Peanut Butter
Peanut butter is the star ingredient of Nutty Bliss Jelly Bars, offering a wonderful combination of flavor and nutrition. Packed with protein, healthy fats, and essential nutrients, peanut butter not only fuels your body but also adds creaminess to the bars. It binds all the ingredients together and elevates the taste to new heights. For those with nut allergies, sunflower seed butter or almond butter can be used as a substitute, allowing everyone to enjoy these bars.
Vanilla Extract
A splash of vanilla extract is a simple yet effective way to elevate the overall flavor of the Nutty Bliss Jelly Bars. Vanilla adds a warm and inviting aroma, enhancing the sweetness of the brown sugar and the fruit jam. It complements the nutty flavors of the peanut butter and rounds out the taste experience.
Raspberry or Strawberry Jam
The choice of fruit jam is what gives Nutty Bliss Jelly Bars their delightful sweetness and fruity flavor. Whether you opt for raspberry or strawberry jam, this ingredient adds a burst of fruity goodness that pairs perfectly with the nutty elements. The jam also provides moisture, making the bars more enjoyable to eat. You can even experiment with other fruit preserves to personalize your treat.
Chopped Nuts (Optional)
For those who crave an extra crunch, adding chopped nuts is a fantastic option. Nuts such as walnuts, almonds, or pecans not only boost the nutritional content of the bars with added protein and healthy fats but also introduce a delightful crunch that contrasts with the chewy oats and creamy peanut butter. This optional ingredient allows you to customize the bars to your liking and enhance their texture.
Cinnamon (Optional)
Cinnamon is another optional ingredient that can elevate the flavor profile of your Nutty Bliss Jelly Bars. Known for its warm, sweet taste, cinnamon complements the nuttiness of peanut butter and the sweetness of jam beautifully. It also adds a touch of warmth, making these bars even more comforting and delectable.
Step-by-Step Instructions
Now that we’ve explored the ingredients and their importance, let’s dive into the preparation of Nutty Bliss Jelly Bars. Following these clear, step-by-step instructions will ensure your baking experience is smooth and successful.
Preheat the Oven
Before you begin mixing your ingredients, preheating the oven is essential. Set it to 350°F (175°C). Preheating ensures that your Nutty Bliss Jelly Bars bake evenly and achieve the perfect texture. An adequately heated oven helps the bars rise and firm up properly, resulting in a delightful treat that’s not too dense or undercooked.
Mixing Dry Ingredients
Start by gathering a large mixing bowl and measuring out your dry ingredients. Combine the rolled oats, all-purpose flour, baking soda, salt, and cinnamon (if using). Whisk these ingredients together to ensure they are evenly mixed. This step is crucial for avoiding lumps in your batter and ensuring that the leavening agent is distributed uniformly. The whisking helps integrate the baking soda and salt, setting the foundation for a well-balanced flavor in the final product.
Combining Wet Ingredients
In a separate bowl, measure out your wet ingredients: melted unsalted butter, peanut butter, brown sugar, vanilla extract, and your choice of fruit jam. Use a spatula or a hand mixer to blend these ingredients until smooth and creamy. This mixture should be well combined, allowing the flavors of the peanut butter and jam to meld together.
Make sure that the brown sugar is fully integrated, as any clumps can lead to uneven sweetness in your bars. The goal is to create a homogenous mixture that will bind well with your dry ingredients, ensuring that every bite is equally delicious.
Incorporating the Mixtures
Once you have your dry and wet ingredients prepared, it’s time to bring them together. Gradually add the dry mixture into the wet mixture, stirring gently until just combined. Be careful not to overmix, as this can lead to dense bars. The batter should come together nicely, with visible oats and a creamy texture.
If you’re including chopped nuts, fold them into the mixture at this stage for an added crunch. This is also the time to adjust the consistency—if the mixture seems too dry, you can add a splash of milk or coconut milk to achieve your desired texture.
The resulting batter should be thick enough to hold its shape when pressed into a baking dish but still spreadable. This balance is key to achieving the perfect Nutty Bliss Jelly Bars that are both chewy and satisfying.
Preparing the Baking Dish
Prepare an 8×8 inch or 9×9 inch baking dish by greasing it lightly with cooking spray or lining it with parchment paper. This ensures that your bars can be easily removed once baked. If you’re using parchment paper, leave some overhang on the sides for easy lifting. This will make cutting the bars much simpler after they have cooled.
With the baking dish ready, pour the batter into the prepared dish, spreading it out evenly with a spatula. Press the mixture down firmly to create a compact layer. This step is crucial, as a well-pressed mixture will hold together better once baked, preventing the bars from crumbling.
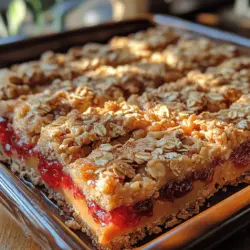
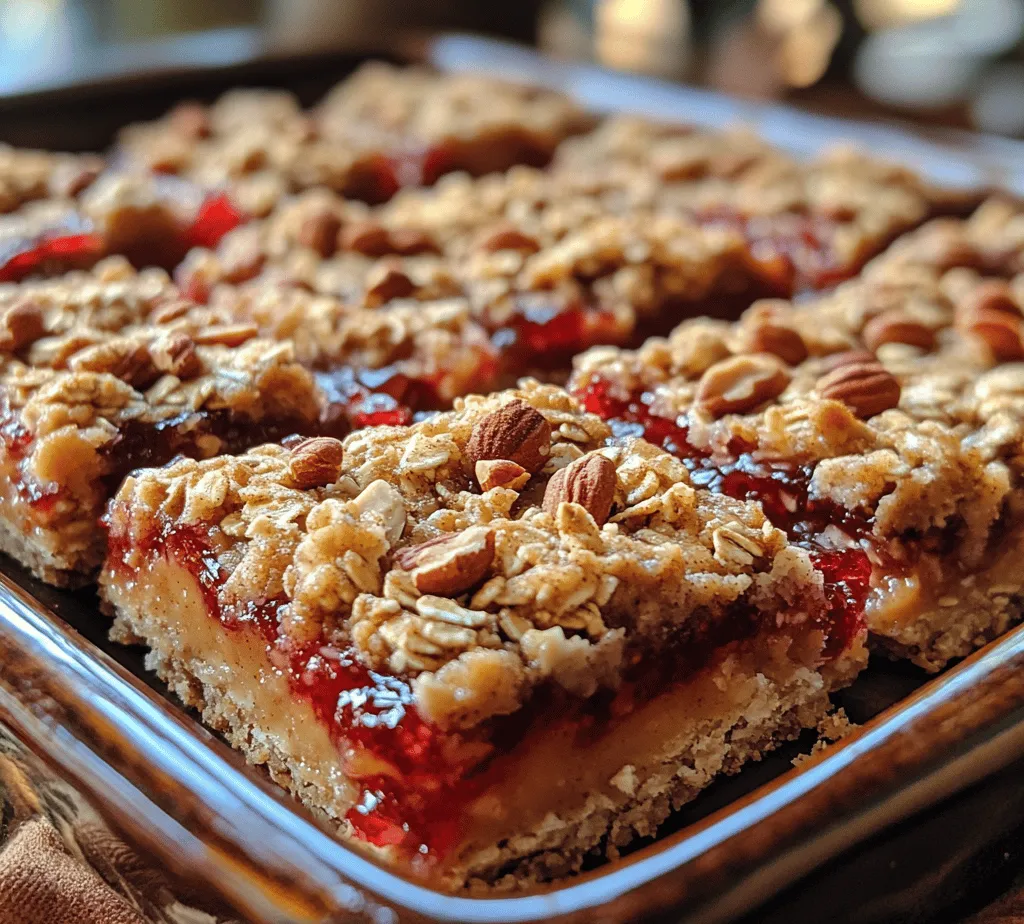
Layering the Jam
Now comes the fun part—adding the fruit jam! Spoon dollops of your chosen raspberry or strawberry jam over the surface of the batter. Use a spatula or the back of a spoon to spread the jam evenly. You want to create a generous layer, ensuring that every bite of the Nutty Bliss Jelly Bars is infused with fruity goodness.
Feel free to create patterns or swirls with the jam, allowing it to integrate slightly into the batter but not completely mix in. This will create a delightful visual appeal and ensure that the jam flavor is prominent throughout the bars.
Baking the Bars
Now that your Nutty Bliss Jelly Bars are assembled and ready, it’s time to bake them. Place the baking dish in the preheated oven and bake for approximately 25-30 minutes, or until the edges are golden brown and the center is set. Check for doneness by inserting a toothpick into the center; it should come out with a few moist crumbs but not wet batter.
Once baked, remove the dish from the oven and allow the bars to cool in the pan for about 10 minutes. Then, using the parchment overhang, lift the bars out of the pan and place them on a wire rack to cool completely. This cooling process allows the bars to firm up further, making them easier to cut into squares or rectangles.
As you prepare to enjoy your Nutty Bliss Jelly Bars, you’ll find that they not only fulfill your cravings but also provide wholesome nutrition, making them an excellent addition to your snack repertoire. Stay tuned for the next part, where we’ll explore some tips for achieving the best results and address common questions about this delicious recipe.
Incorporating Wet into Dry: The Significance of Careful Mixing
Once you have your dry ingredients measured out—oats, flour, nuts, and any spices—it’s time to incorporate the wet ingredients. This step is crucial for achieving the perfect texture of your Nutty Bliss Jelly Bars. Begin by creating a well in the center of your dry mixture, then pour in your wet ingredients, which typically include a combination of nut butter, honey or maple syrup, and vanilla extract.
Mix gently but thoroughly with a spatula or wooden spoon, ensuring that every bit of the dry ingredients is moistened without overmixing. This careful mixing will help maintain the bars’ chewy texture and prevent them from becoming too dense. Overmixing can lead to tougher bars, so aim for a consistent, slightly sticky mixture that holds together when pressed.
Pressing the Mixture: Techniques for Even Distribution in the Baking Dish
After achieving a well-mixed batter, it’s time to transfer the mixture into your prepared baking dish. Use a spatula to scoop the mixture and place it into the dish, but don’t rush this step. To ensure even distribution, start by placing dollops of the mixture across the surface of the dish. This allows you to spread it out more evenly in the next step.
Once all the mixture is in the dish, use the back of a measuring cup or your hands to press it down firmly and evenly. Start from the center and work your way out toward the edges. This technique will help create a uniform thickness, which is key for consistent baking. Make sure the mixture is tightly packed to avoid crumbling after baking.
Adding the Jam Layer: How to Ensure an Even Spread for Consistent Flavor
With the base layer pressed down, it’s time to add the jam layer, which is the heart of the Nutty Bliss Jelly Bars. Choose a jam or fruit spread that complements the nutty flavors of your bars—strawberry, raspberry, or even a mixed berry jam works beautifully.
Using a clean spatula or the back of a spoon, scoop out the jam and dollop it over the pressed base. To achieve an even spread, gently warm the jam if it’s too thick; this will make it easier to spread without tearing the base layer. Carefully smooth the jam out toward the edges, ensuring it reaches all corners of the bars for consistent flavor in every bite.
Topping with Remaining Mixture: Balancing the Top Layer for Even Baking
After the jam layer is evenly applied, it’s time to top it with the remaining mixture. This creates a delicious, crumbly topping that will bake to perfection. Again, scoop the mixture and place it in dollops over the jam layer.
Once you’ve covered the jam, use your hands to gently spread and press the mixture down. Ensure that the jam is fully covered, but try not to disturb the jam layer underneath. This balance is essential for keeping the bars moist while achieving a delightful crunch on top after baking.
Baking Process: Understanding Baking Times and Visual Cues for Doneness
Preheat your oven to the temperature indicated in your recipe, typically around 350°F (175°C). Place the baking dish in the oven and set a timer based on the recommended baking time—usually around 25 to 30 minutes.
Keep an eye on the bars as they bake. You’ll know they are done when the top is golden brown and firm to the touch. If you gently press down on the center, it should spring back slightly. Another good indicator is the smell; your kitchen will be filled with the rich aroma of roasted nuts and warm fruit.
Cooling Down: Importance of Cooling for Slicing and Flavor Development
Once baked, remove the baking dish from the oven and let it cool in the pan for at least 10 to 15 minutes. This cooling period allows the bars to set, making them easier to slice later. For even better results, transfer the dish to a wire rack to cool completely.
Cooling is crucial not just for slicing but also for allowing the flavors to meld together. The nutty, fruity notes will develop further as they cool, resulting in a more harmonious taste in every bite.
Slicing and Serving: Methods for Cutting Bars and Serving Suggestions
Once your Nutty Bliss Jelly Bars have cooled completely, it’s time to slice them into perfect squares or rectangles. Use a sharp knife to make clean cuts, which will help prevent crumbling. To achieve even portions, consider measuring out the bars beforehand, marking light lines on the top with a knife before cutting.
These bars can be served as a quick snack, a healthy dessert, or even as part of a breakfast spread. Pair them with a dollop of Greek yogurt or a drizzle of additional nut butter for a balanced snack. They also make a fantastic addition to lunchboxes or picnic baskets.
Nutritional Benefits of Nutty Bliss Jelly Bars
Nutty Bliss Jelly Bars are not only delicious but also packed with nutritional benefits. The primary ingredients—oats and nuts—bring a wealth of health advantages. Oats are a fantastic source of complex carbohydrates and dietary fiber, which help keep you full and satisfied while supporting digestive health. They are also rich in essential vitamins and minerals, including iron, magnesium, and B vitamins.
The nuts in this recipe provide healthy fats, protein, and additional fiber, making these bars a great energy booster. The balanced macronutrient profile—carbohydrates from oats, healthy fats from nuts, and protein from the nut butter—ensures that these bars can serve as a nutritious snack or meal replacement.
Using natural sweeteners like honey or maple syrup instead of refined sugars means that you’ll enjoy a more wholesome treat without the sugar crash often associated with processed sweets. This makes Nutty Bliss Jelly Bars a smart choice for anyone looking to maintain a balanced diet.
Customizing Your Nutty Bliss Jelly Bars
One of the best aspects of Nutty Bliss Jelly Bars is their versatility. You can easily customize the recipe to suit your taste preferences or dietary needs.
For instance, experiment with different types of nut butters—almond, cashew, or even sunflower seed butter for a nut-free option. Each nut butter will lend a unique flavor profile and texture to your bars.
Switching out the jam is another way to make these bars your own. Use your favorite fruit preserves, or try a homemade fruit compote for a fresher taste. You can also enhance the bars by adding chocolate chips, dried fruits like cranberries or apricots, or seeds such as chia or flax for added nutrition.
If you need to cater to gluten-free diets, consider using alternative flours like almond flour or coconut flour instead of traditional flour. This not only keeps the bars gluten-free but also adds a distinct flavor and texture that many find delightful.
Storing Nutty Bliss Jelly Bars
To keep your Nutty Bliss Jelly Bars fresh, proper storage is key. Once completely cooled, cut the bars and store them in an airtight container. They can be kept at room temperature for up to a week, but for longer storage, it’s best to refrigerate them.
If you want to extend their shelf life even further, consider freezing the bars. Wrap them individually in plastic wrap or parchment paper, then place them in a freezer-safe bag. They can stay frozen for up to three months. When you’re ready to enjoy a bar, simply let it thaw at room temperature for a few hours or pop it in the microwave for a few seconds for a warm treat.
Conclusion
Nutty Bliss Jelly Bars are a delightful combination of healthy ingredients and satisfying flavors. They are not only easy to make but also adaptable to various dietary preferences, making them a perfect addition to any kitchen. Whether you enjoy them as an on-the-go snack, a post-workout energy boost, or a sweet treat after dinner, these bars are sure to please.
We encourage you to try making your own versions of Nutty Bliss Jelly Bars and share your experiences. The joy of creating nutritious snacks at home lies in exploring flavors and ingredients that cater to your personal tastes and dietary needs. Enjoy the process, and savor each delicious bite!