Introduction
If you’re searching for a dessert that perfectly balances creamy and crunchy textures while delivering an explosion of flavor, look no further than these Decadent Biscoff Cheesecake Bars. This delightful treat combines the rich, spiced flavors of Biscoff cookies with a creamy cheesecake filling, creating a dessert that is not only visually appealing but also incredibly satisfying. Cheesecake has long been a beloved dessert across various cultures, often reserved for special occasions or family gatherings. However, this recipe elevates the classic cheesecake experience to new heights, making it suitable for any day of the week.
Growing up, our family had a tradition of gathering around the dining table after dinner to indulge in dessert. One of my fondest memories is of my grandmother presenting her signature cheesecake, its smooth surface glistening under the soft glow of the dining room lights. It was a recipe passed down through the generations, a cherished family secret. Inspired by that legacy, I wanted to create a modern take on cheesecake that would invoke the same warmth and nostalgia. Enter the Biscoff Cheesecake Bars: a combination of my love for classic desserts and the delightful crunch of Biscoff cookies, which have taken the world by storm.
The significance of this recipe extends beyond mere flavor. Biscoff cookies, originally known as speculoos, have their roots in Belgium, where they are traditionally served with coffee. Their unique caramelized flavor profile complements the creaminess of the cheesecake, resulting in a dessert that transcends borders and resonates with dessert lovers everywhere. Whether you’re celebrating a special occasion or simply treating yourself, these cheesecake bars are sure to impress.
Understanding the Ingredients
To craft these Decadent Biscoff Cheesecake Bars, you’ll need a selection of high-quality ingredients that not only contribute to the flavor but also ensure the perfect texture. Here’s a breakdown of the key ingredients and their roles in this recipe:
Main Ingredients
1. Biscoff Cookies: The star of the show! These cookies provide both the crust and a delightful crunch throughout the cheesecake. Their caramelized flavor is essential for creating that signature taste.
2. Cream Cheese: The base of any cheesecake, cream cheese brings richness and creaminess to the dessert. It’s crucial to use full-fat cream cheese for the best texture and flavor.
3. Granulated Sugar: This sweetener balances the tanginess of the cream cheese. It’s important to use the appropriate amount to avoid overpowering the other flavors.
4. Sour Cream: Adding sour cream contributes to the cheesecake’s creamy texture while providing a subtle tang that enhances the overall flavor profile.
5. Eggs: Eggs act as a binder, helping the cheesecake to set properly. They also contribute to the rich, velvety texture.
6. Vanilla Extract: A splash of vanilla enhances the dessert’s flavor, adding warmth and depth that complements the Biscoff cookies.
7. Butter: Used to bind the cookie crust, melted butter adds moisture and richness to the bars.
Tips for Selecting High-Quality Ingredients
When it comes to baking, the quality of your ingredients can significantly affect the final product. Here are some tips for selecting the best ingredients:
– Biscoff Cookies: Opt for authentic Biscoff cookies rather than generic brands, as they offer the best flavor and texture. Check your local grocery store or specialty shops for availability.
– Cream Cheese: Choose a reputable brand of full-fat cream cheese. Avoid reduced-fat varieties, as they can result in a less creamy texture.
– Sour Cream: Look for sour cream that is fresh and high quality. A thicker consistency often yields better results in cheesecake recipes.
– Eggs: Use large eggs, preferably organic or free-range, for the best flavor and quality.
Optional Ingredients and Substitutions
While the ingredients listed above are essential for the traditional flavor of Biscoff Cheesecake Bars, there are a few optional ingredients and substitutions you can consider:
– Add-ins: Feel free to incorporate chocolate chips or crushed nuts into the cheesecake filling for added texture.
– Plant-Based Options: For a vegan version, you can use dairy-free cream cheese, a flaxseed egg substitute, and coconut cream in place of sour cream.
– Gluten-Free: For a gluten-free option, substitute Biscoff cookies with gluten-free cookies or make your own crust using gluten-free graham crackers.
Exploring Variations for Dietary Preferences
The beauty of cheesecake bars lies in their versatility. Here are some variations to cater to different dietary preferences:
– Chocolate Biscoff Cheesecake Bars: Add melted chocolate to the cream cheese filling for a chocolatey twist.
– Fruit Swirls: Incorporate fruit purees, such as raspberry or strawberry, into the cheesecake mixture for a fruity flavor explosion.
– Nutty Version: Mix in chopped nuts or a nut crust for an extra crunch and flavor.
Preparation Steps
Before diving into the cooking process, it’s essential to gather your tools and prepare your workspace. Here’s what you’ll need:
Essential Kitchen Tools and Equipment
– 9×9-inch Baking Pan: For the perfect size of cheesecake bars.
– Mixing Bowls: Various sizes for mixing ingredients.
– Electric Mixer: A hand mixer or stand mixer will work wonders in achieving a smooth cheesecake batter.
– Rubber Spatula: Great for scraping down the sides of bowls and folding ingredients together.
– Parchment Paper: Lining your baking pan will make it easier to remove the cheesecake bars once they’re set.
– Measuring Cups and Spoons: Accurate measurements are key to successful baking.
– Cooling Rack: To cool the cheesecake bars evenly after baking.
Step-by-Step Guide to Preparation
Now that you have your ingredients and tools ready let’s get started with the preparation process:
1. Preheat the Oven: Begin by preheating your oven to 325°F (160°C). This temperature is ideal for baking cheesecake, allowing it to set without cracking.
2. Prepare the Baking Pan: Line your 9×9-inch baking pan with parchment paper, leaving some overhang on the sides. This will help you lift the bars out easily once they’re cooled.
3. Make the Cookie Crust:
– In a mixing bowl, crush the Biscoff cookies into fine crumbs. You can do this using a food processor or by placing them in a zip-top bag and crushing them with a rolling pin.
– Combine the cookie crumbs with melted butter in a bowl until the mixture resembles wet sand.
– Press the mixture firmly into the bottom of the prepared baking pan to create an even layer.
4. Prepare the Cheesecake Filling:
– In a large mixing bowl, beat the room-temperature cream cheese with an electric mixer until smooth and creamy, about 2-3 minutes.
– Gradually add the granulated sugar, mixing until fully incorporated.
– Add the sour cream and vanilla extract, mixing until combined.
– Finally, add the eggs one at a time, mixing on low speed to avoid overbeating. The filling should be thick and smooth.
5. Assemble the Bars:
– Pour the cheesecake filling over the prepared cookie crust, spreading it evenly with a spatula.
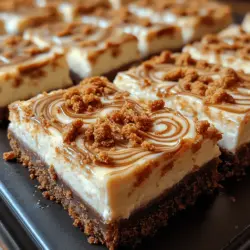
– If desired, sprinkle crushed Biscoff cookies on top for added texture and visual appeal.
Detailed Instructions on Preparation Techniques
To achieve the perfect cheesecake bars, attention to detail is crucial:
– Room Temperature Ingredients: Ensure that your cream cheese and eggs are at room temperature. This allows for smoother mixing and a lump-free filling.
– Mixing Techniques: When mixing the cheesecake batter, be careful not to overmix once the eggs are added. Overmixing can incorporate too much air, leading to cracks in the finished bars.
– Even Layering: When pressing the cookie crust into the pan, make sure it’s evenly distributed to avoid uneven baking.
Cooking Method
Understanding the cooking methods used in making these cheesecake bars is essential for mastering the recipe:
Overview of the Cooking Techniques Used
The primary cooking technique for these cheesecake bars is baking. Baking allows the cheesecake to set evenly while developing its rich flavor. The combination of low heat and a longer baking time ensures that the texture remains creamy and luscious without becoming dry.
Explanation of Why Specific Methods Are Chosen
Baking at a moderate temperature (325°F or 160°C) helps to gently cook the cheesecake, allowing it to rise slowly and set without curdling. This method is preferable to higher temperatures, which can lead to cracks and uneven texture. Additionally, using a water bath can further insulate the cheesecake and promote even baking, although this recipe can be baked without one for simplicity.
Detailed Cooking Process
Once your cheesecake bars are assembled, it’s time to bake them:
1. Place the prepared pan in the preheated oven and bake for 45-50 minutes, or until the edges are set and the center has a slight jiggle.
2. After baking, turn off the oven and crack the oven door open, allowing the cheesecake to cool gradually. This step helps prevent cracks from forming due to sudden temperature changes.
3. Allow the cheesecake bars to cool in the oven for about an hour, then transfer them to a wire rack to cool completely at room temperature.
Timing and Temperature Considerations
Baking times may vary depending on your oven and the size of your pan. Keep an eye on your cheesecake bars during the last few minutes of baking to prevent overcooking. Once they are cool, refrigerate them for at least four hours or overnight to allow them to set properly before slicing.
With these steps, you’re well on your way to creating the most decadent Biscoff Cheesecake Bars that will wow your family and friends. The combination of creamy cheesecake and the unmistakable flavor of Biscoff cookies will surely make this dessert a favorite in your home. Stay tuned for the next part, where we will dive into serving suggestions, storage tips, and answers to common questions about this delightful treat.
Tips for Achieving the Best Results
Creating the perfect Biscoff cheesecake bars requires attention to detail and a few helpful tips to ensure your dessert turns out rich, creamy, and utterly delicious. Here are some essential tips to guide you through the process:
1. Use Room Temperature Ingredients: Make sure your cream cheese, eggs, and sour cream are at room temperature before you start mixing. This helps create a smooth and creamy batter without lumps.
2. Crush Cookies Properly: For the crust, ensure that the Biscoff cookies are finely crushed. This will help to create a uniform texture and prevent larger pieces from disrupting the crust’s integrity.
3. Don’t Overmix: When combining the cheesecake filling, mix just until the ingredients are incorporated. Overmixing can introduce too much air into the batter, leading to cracks during baking.
4. Use a Water Bath: For an ultra-creamy texture, consider baking your cheesecake bars in a water bath. Wrap the bottom of your springform pan in aluminum foil to prevent leaks, then place it in a larger pan filled with hot water. This gentle cooking method helps to maintain even heat.
5. Cool Gradually: After baking, allow the cheesecake bars to cool gradually in the oven with the door slightly ajar. This helps prevent sudden temperature changes that can cause cracks.
6. Chill Thoroughly: Allow the cheesecake bars to chill in the refrigerator for at least four hours, preferably overnight. This not only helps the flavors to meld but also ensures a clean slice when cutting.
Serving Suggestions
When it comes to serving your decadent Biscoff cheesecake bars, there are numerous options to elevate your presentation and flavor profile:
Ideal Pairings and Accompaniments
– Biscoff Drizzle: Drizzle melted Biscoff spread on top of the cheesecake bars for an extra layer of flavor and a beautiful presentation.
– Whipped Cream: A dollop of freshly whipped cream can add a light and airy contrast to the rich cheesecake. Consider adding a sprinkle of crushed Biscoff cookies on top for texture.
– Fresh Fruit: Serve with a side of fresh berries, such as raspberries or strawberries, which provide a tartness that balances the sweetness of the cheesecake.
– Chocolate Sauce: A drizzle of chocolate sauce can complement the flavors beautifully, offering a decadent touch that chocolate lovers will appreciate.
Presentation Tips for an Appealing Dish
– Clean Cuts: Use a sharp knife dipped in hot water to slice the bars for clean edges. Wipe the knife between cuts to maintain the integrity of the dessert.
– Plating: Serve the bars on a white plate to allow their golden color to stand out. Garnish with a few mint leaves or a light dusting of powdered sugar for an elegant touch.
– Layering: Stack the bars vertically on a decorative serving platter for a stunning presentation, alternating with whipped cream or fruit for visual interest.
Nutritional Information
Understanding the nutritional profile of your Biscoff cheesecake bars can help you enjoy them mindfully. Here’s a breakdown of the nutritional values per serving (based on a standard 12-bar recipe):
– Calories: Approximately 350 calories per bar
– Total Fat: 24g (Saturated Fat: 12g)
– Cholesterol: 100mg
– Sodium: 210mg
– Total Carbohydrates: 30g (Dietary Fiber: 1g, Sugars: 20g)
– Protein: 4g
Discussion on Health Benefits of the Ingredients
While these cheesecake bars are indulgent, they also contain ingredients that offer some benefits:
– Cream Cheese: Provides a source of calcium, which is essential for bone health, and can contribute to a sense of satiety.
– Biscoff Cookies: Made with natural ingredients, these cookies can provide a quick energy boost, though moderation is key due to their sugar content.
Cultural Significance
Cheesecake has a rich history that spans many cultures and centuries. Originating in ancient Greece, where it was served to athletes during the first Olympic Games, cheesecake has evolved significantly over time.
Historical Background of the Dish
The Romans later adapted the Greek cheesecake, adding new ingredients and techniques. In the Middle Ages, cheesecakes made their way to England, where they were baked in a pastry shell, creating the foundation for modern cheesecakes.
Regional Variations and Adaptations
In America, cheesecake has taken on distinctive forms, with New York-style cheesecake being renowned for its rich, dense texture. The Biscoff cheesecake bars we’re discussing today represent a modern twist, combining the beloved flavors of speculoos cookies with traditional cheesecake elements.
Exploration of How Different Cultures Prepare the Dish
Different cultures add unique flavors and styles to their cheesecakes. For instance, Japanese cheesecake is lighter and fluffier, often incorporating meringue for a delicate texture. In contrast, Italian ricotta cheesecake features a grainy texture and is often flavored with citrus.
Common Mistakes to Avoid
To ensure your Biscoff cheesecake bars are perfect, be aware of these common pitfalls:
1. Not Using Fresh Ingredients: Ensure your cream cheese and other dairy ingredients are fresh. Expired products can alter the flavor and texture.
2. Skipping the Cooling Process: Rushing the cooling process can lead to cracks in the cheesecake. Always allow it to cool gradually.
3. Not Prepping the Pan Properly: Failing to line or grease your pan can result in sticking, making it difficult to remove the bars once they’re set.
4. Overbaking: Keep an eye on your cheesecake bars while baking. They should be set around the edges but slightly jiggly in the center when done.
5. Not Letting Them Rest: Allow your cheesecake bars to rest in the refrigerator for several hours before serving. This helps enhance the flavors and achieve the perfect texture.
Conclusion
The decadent Biscoff cheesecake bars are a delightful treat that combines creamy cheesecake with the warm, spiced flavor of Biscoff cookies. This recipe not only satisfies your sweet tooth but also offers a glimpse into the rich history of cheesecake across cultures.
As you explore the joy of making these bars at home, remember to follow the tips for best results, serve them with complementary flavors, and avoid common mistakes. Whether for a special occasion or an everyday indulgence, these cheesecake bars are sure to impress. So gather your ingredients, unleash your creativity, and enjoy the process of crafting this delightful dessert!