Introduction
There’s nothing quite like the joy of making homemade fudge—it’s a delightful treat that evokes nostalgia and brings a sense of comfort. The rich, creamy texture and melt-in-your-mouth flavor make fudge a beloved dessert for many. If you’re looking for a simple yet sumptuous treat, this Quick & Creamy Peanut Butter Fudge recipe is just what you need.
What sets this recipe apart is its simplicity and speed; you can whip up a batch in under 30 minutes. With just a few common ingredients, you can create a deliciously indulgent treat that will satisfy even the most discerning sweet tooth. Not only is this fudge quick and easy to make, but it’s also incredibly versatile. You can customize it with various toppings, such as chopped nuts, chocolate chips, or sea salt, allowing you to tailor it to your taste preferences.
Moreover, this recipe caters to health-conscious individuals by using natural sweeteners and wholesome ingredients. With creamy peanut butter, coconut oil, and the option of honey or maple syrup, you can indulge without the guilt often associated with traditional fudge recipes that rely heavily on refined sugars.
In this article, we will explore the ingredients that make this fudge not only delicious but also a more wholesome option. We will provide a step-by-step guide to making your own Quick & Creamy Peanut Butter Fudge, ensuring that you can easily recreate this treat in your own kitchen.
Understanding the Ingredients
Creamy Peanut Butter
At the heart of this Quick & Creamy Peanut Butter Fudge is, of course, creamy peanut butter. Its role is paramount, providing both the signature flavor and a luscious creaminess that is essential for a satisfying fudge. Peanut butter is rich and nutty, making it a favorite ingredient in many desserts, and it plays a vital role in creating a rich texture in this fudge.
Beyond its delicious taste, peanut butter is also packed with nutrition. It is a good source of protein, healthy fats, and essential vitamins and minerals, including vitamin E, magnesium, and potassium. Incorporating peanut butter into your diet can help keep you feeling full and satisfied, making it a healthier option for snacking.
Unsweetened Cocoa Powder
To elevate the flavor profile of our fudge, unsweetened cocoa powder is added, providing a rich chocolate flavor that perfectly complements the peanut butter. Cocoa powder is an excellent choice for those looking to indulge in chocolate without the added sugars and fats found in many pre-packaged chocolate products.
Choosing unsweetened cocoa means you have full control over the sweetness of your fudge. Cocoa powder is loaded with antioxidants and has been linked to various health benefits, such as improved heart health and better blood flow. Its rich flavor enhances the overall taste of the fudge, making it a delightful treat for chocolate lovers.
Natural Sweeteners: Honey and Maple Syrup
In this recipe, we can opt for either honey or maple syrup as natural sweeteners. Both options are healthier alternatives to refined sugars, providing a unique flavor and texture to the fudge. Honey, with its floral notes, adds a distinct sweetness, while maple syrup imparts a caramel-like flavor that pairs beautifully with peanut butter.
Both sweeteners are not only delicious but also offer nutritional benefits. Honey is known for its antibacterial properties and can be a source of antioxidants, while maple syrup contains minerals such as zinc and manganese. Using these natural sweeteners not only enhances the flavor but also promotes a healthier dessert option.
Coconut Oil
Coconut oil is another key ingredient that contributes to the creamy texture of our fudge. It acts as a binding agent, helping to solidify the fudge while providing a rich mouthfeel. The addition of coconut oil also adds a subtle coconut flavor that complements the peanut butter beautifully.
From a health perspective, coconut oil is often praised for its medium-chain triglycerides (MCTs), which are believed to provide various health benefits, such as improved metabolism and increased energy levels. While coconut oil is high in saturated fats, it is important to note that not all saturated fats are created equal. In moderation, coconut oil can be a nutritious addition to your diet.
Vanilla Extract and Salt
To round out the flavors, we will add a splash of vanilla extract and a pinch of salt. The addition of vanilla enhances the overall flavor profile of the fudge, making it more aromatic and delicious. Vanilla has a way of elevating desserts, adding depth and complexity to the taste.
Salt plays a crucial role in balancing the sweetness of the fudge. A small amount of salt helps to enhance the flavors of all the other ingredients, making the fudge more enjoyable. The combination of sweet and salty is a classic pairing that works exceptionally well in this recipe.
Step-by-Step Guide to Making Peanut Butter Fudge
Mixing the Base
To start making your Quick & Creamy Peanut Butter Fudge, you’ll want to begin by preparing the base mixture. In a medium-sized mixing bowl, combine the creamy peanut butter, coconut oil, honey (or maple syrup), unsweetened cocoa powder, and vanilla extract.
Using a spatula or a whisk, mix the ingredients together thoroughly until they are well combined and the mixture is smooth. It’s essential to mix well to avoid any lumps, ensuring that the fudge has a delightful, creamy texture. If you find the mixture is too thick, you can gently heat it in the microwave for about 10-15 seconds to loosen it up, making it easier to blend.
Preparing the Dish
While mixing the base, you can also prepare your baking dish. For the best results, choose an 8-inch square baking dish and line it with parchment paper. This will prevent the fudge from sticking and make it easier to remove once set.
To line the dish, cut a piece of parchment paper that is large enough to cover the bottom and sides. You can use a little bit of coconut oil to grease the dish lightly before placing the parchment, ensuring it stays in place. This simple step will make your fudge removal process hassle-free and keep your dish clean.
With the base mixed and the dish prepared, you are now ready to pour the mixture into the lined baking dish. Spread it evenly using a spatula, ensuring that it fills the corners and edges.
Stay tuned for the next steps in this Quick & Creamy Peanut Butter Fudge recipe, where we will cover how to set the fudge and enhance it with optional toppings, making it even more delightful!
Tips for Ensuring Easy Removal of the Fudge Later
To ensure that your Quick & Creamy Peanut Butter Fudge comes out of the baking dish effortlessly, it’s crucial to take a few preparatory steps. First, line your baking dish with parchment paper, allowing some overhang on the sides. This will create a sling that makes lifting out the fudge a breeze. Be sure to grease the parchment lightly with cooking spray or a thin layer of oil to prevent sticking.
Additionally, allowing the fudge to cool in the dish for a short period before transferring it to the refrigerator can help. This step allows it to set slightly, making it less likely to stick to the sides. Finally, when you’re ready to remove the fudge, gently pull on the parchment paper overhang to lift the entire block out. This technique minimizes the risk of breaking the fudge and maintains its lovely presentation.
Spreading the Mixture
Once your fudge mixture is prepared and poured into the lined baking dish, it’s time to focus on spreading it evenly. Achieving a uniform layer is essential for both texture and appearance. Use a rubber spatula or the back of a spoon to spread the mixture out, gently pressing it into the corners of the dish. Start from the center and work your way outward, ensuring that the fudge reaches all edges.
For an even smoother top, consider using a small offset spatula. This tool can help create a perfectly flat surface, which is particularly important for presentation, especially if you plan to add toppings later. A smooth surface not only looks appealing but also ensures that any additional toppings will adhere properly and enhance the overall texture and taste of the fudge.
Adding Optional Toppings
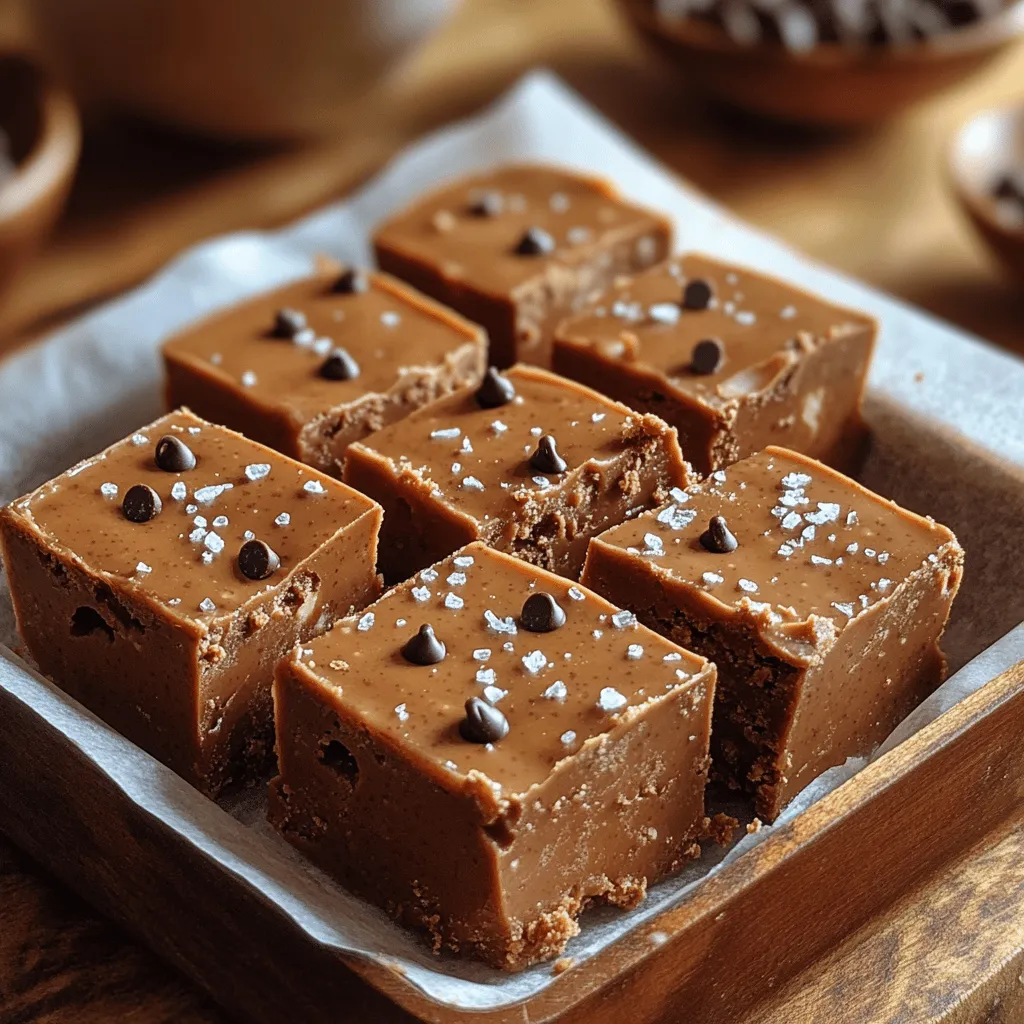
Toppings can transform your peanut butter fudge from delicious to extraordinary. Consider adding a sprinkle of sea salt on top right before the fudge sets to enhance the flavor profile. The salty-sweet contrast can elevate the fudge to a gourmet treat.
Other creative toppings include crushed nuts like peanuts or almonds, which add a satisfying crunch, or a drizzle of melted chocolate for a decadent touch. You might also consider adding mini marshmallows or shredded coconut for a tropical twist. Each topping can contribute unique flavors and textures, making your fudge not only delicious but visually stunning as well.
When applying toppings, do so while the fudge is still slightly warm, as this will help them adhere better. Press them gently into the surface to ensure they stay put when you cut the fudge later.
Chilling the Fudge
The chilling process is a critical step in achieving the ideal texture for your peanut butter fudge. Once you’ve spread the mixture and added any toppings, place the baking dish in the refrigerator. This allows the fudge to firm up properly, resulting in a creamy, melt-in-your-mouth consistency.
For those who are short on time, you can speed up the setting process by placing the dish in the freezer. Generally, 30 to 60 minutes in the freezer should suffice, depending on the thickness of the fudge. Just keep an eye on it to prevent it from becoming overly hard. The fudge is ready when it feels firm to the touch but still has a slight give when pressed.
Cutting and Serving
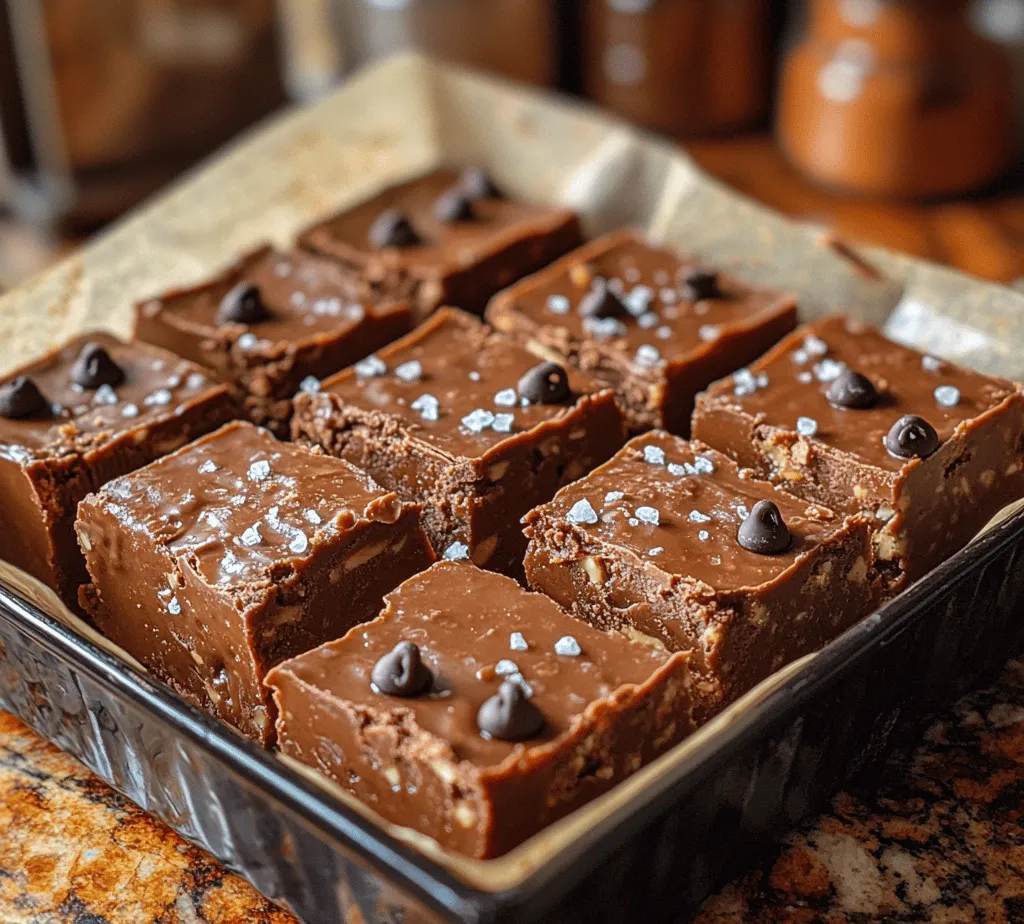
Cutting fudge can be a delicate task, but with the right techniques, you can achieve beautiful, clean squares without crumbling. Start by allowing the fudge to sit at room temperature for a few minutes after chilling; this will make it easier to cut. Use a sharp knife that has been warmed under hot water—this helps to create clean cuts without dragging.
To cut the fudge, first, make long, even slices across the width of the dish, then go back to cut perpendicular slices to create squares. You can wipe the knife clean between cuts if you find the fudge sticking. For a visually appealing presentation, consider serving the fudge on a decorative platter or wrapping individual pieces in parchment paper tied with twine for a rustic touch.
Nutritional Information
Understanding the nutritional profile of your Quick & Creamy Peanut Butter Fudge can enhance your enjoyment. Each serving (approximately 1-inch square) contains an estimated 120 calories, with a breakdown of about 7 grams of fat, 10 grams of carbohydrates, and 3 grams of protein. The primary ingredients—peanut butter and sweeteners—contribute healthy fats and protein, making this treat more satisfying than many other desserts.
For those mindful of dietary restrictions, this fudge can easily be made vegan by using maple syrup or agave nectar instead of honey. Additionally, since it contains no flour, it is naturally gluten-free, making it a suitable option for those with celiac disease or gluten sensitivity.
Storage and Shelf Life
Proper storage is key to maintaining the freshness of your peanut butter fudge. To store, place the cut fudge pieces in an airtight container, separating layers with parchment paper to prevent sticking. When stored correctly in the refrigerator, the fudge can last up to two weeks.
For longer-term storage, consider freezing the fudge. Wrap individual pieces tightly in plastic wrap and then place them in a freezer-safe container or bag. Frozen fudge can last for up to three months. When you’re ready to enjoy it, simply remove it from the freezer and let it thaw at room temperature for about 15 minutes before serving.
Creative Variations of Peanut Butter Fudge
While the basic recipe for Quick & Creamy Peanut Butter Fudge is undeniably delicious, there are countless ways to customize it to suit your palate. Experimenting with different nut butters, such as almond or cashew butter, can provide a unique twist. Additionally, you might add flavor extracts like vanilla or almond to enhance the depth of flavor.
Consider incorporating mix-ins, such as dried fruits, seeds, or even a swirl of jam for a fruity contrast. Seasonal variations can also be a hit; for example, adding pumpkin spice during the fall or a hint of peppermint extract during the winter holidays can create a festive treat.
Conclusion
Making Quick & Creamy Peanut Butter Fudge is not only simple but incredibly satisfying. This recipe offers a delightful balance of creamy, nutty flavor and can be customized in numerous ways to suit your taste. Whether you stick to the classic version or explore creative variations, the joy of crafting homemade treats is unmatched. Enjoy sharing your fudge with friends and family—there’s nothing quite like the pleasure of a homemade dessert that brings smiles to everyone’s faces. So grab your ingredients, get creative, and savor the deliciousness of your very own peanut butter fudge!
