Introduction
No-bake desserts have become a staple in the culinary world, especially during the warmer months when the thought of turning on the oven can feel unbearable. These delightful treats offer a refreshing alternative to traditional baked goods, allowing for quick assembly and minimal fuss. Among the myriad of no-bake options, one standout recipe that captures the essence of summer is the Zesty No-Bake Key Lime Cheesecake Cups. This dessert is not only easy to make but also delivers a tangy burst of flavor that evokes memories of sun-soaked beaches and breezy gatherings.
Key lime flavor has long been associated with sunny days and tropical vibes. Originating from the Florida Keys, key lime pie has been a beloved dessert for generations, celebrated for its unique balance of sweet and tart. Our Zesty No-Bake Key Lime Cheesecake Cups elevate this classic dessert into an easy-to-serve format, perfect for picnics, barbecues, or simply enjoying at home. With their creamy texture and zesty lime flavor, these cheesecake cups are sure to impress your guests and satisfy your sweet tooth.
Understanding the Ingredients
To create the perfect Zesty No-Bake Key Lime Cheesecake Cups, it’s essential to understand the role of each ingredient in the recipe. Each component contributes to the overall flavor, texture, and presentation of the dessert, making it crucial to choose high-quality ingredients.
Graham Cracker Crumbs
The foundation of our cheesecake cups is the crust, made from graham cracker crumbs. These crumbs provide a delightful crunch and a hint of sweetness that complements the creamy filling. When crushed finely, they create a texture that holds together well while still being easy to scoop. The buttery, toasty flavor of graham crackers adds depth to the crust, enhancing the overall taste of the dessert.
Unsalted Butter
Unsalted butter plays a critical role in binding the graham cracker crumbs together to form a sturdy crust. It adds richness and moisture, ensuring that the crust holds its shape while offering a delicious buttery flavor. Using unsalted butter allows you to control the overall saltiness of the dessert, allowing the zesty key lime flavor to shine through.
Granulated Sugar and Powdered Sugar
In this recipe, both granulated sugar and powdered sugar are used, each serving a distinct purpose. Granulated sugar provides sweetness and a slight crunch to the crust, while powdered sugar, with its fine texture, contributes to the creaminess of the cheesecake filling. The combination of these sugars ensures a balanced sweetness that doesn’t overwhelm the tartness of the key lime juice.
Cream Cheese
Cream cheese is the star ingredient in the cheesecake filling, lending its signature creamy texture. It serves as the base for the filling, providing richness and a smooth mouthfeel. When softened, cream cheese blends beautifully with the other ingredients, creating a luscious filling that is both satisfying and indulgent.
Sour Cream
Sour cream is another key player in this recipe, adding a tangy flavor that complements the sweetness of the cheesecake. Its creamy consistency enhances the overall richness of the filling while introducing a slight acidity that balances the flavors. The combination of cream cheese and sour cream creates a velvety texture that is irresistible.
Key Lime Juice
Fresh key lime juice is essential for achieving the authentic flavor of this dessert. Its tartness is what gives the cheesecake its signature zesty kick, cutting through the richness of the cream cheese and sour cream. Opting for fresh juice over bottled alternatives ensures the brightest and most vibrant flavor, making a significant difference in the final product.
Lime Zest
Lime zest adds an aromatic quality and enhances the overall lime flavor of the cheesecake. The essential oils in the zest provide a fragrant burst of citrus that elevates the dessert beyond just the juice. A sprinkle of lime zest not only enhances the taste but also adds visual appeal, giving the cheesecake cups a pop of color.
Whipped Cream
Whipped cream is the crowning touch for our cheesecake cups. Not only does it add a light and airy texture, but it also enhances the presentation, making the dessert look elegant and inviting. A dollop of freshly whipped cream provides a sweet contrast to the tangy filling, creating a well-rounded dessert experience.
Salt
Though it may seem counterintuitive, a pinch of salt can elevate the flavors in this dessert. Salt enhances the sweetness and balances the acidity of the lime juice, ensuring that each bite is perfectly harmonious. It’s a small but mighty addition that can make a noticeable difference in the overall flavor profile.
Preparation of the Crust
Now that we’ve explored the ingredients, let’s dive into the preparation of the crust—the first step in our no-bake key lime cheesecake cups. Making the graham cracker crust is simple and straightforward, but there are a few tips to keep in mind for achieving the perfect consistency and firmness.
1. Crushing the Graham Crackers: Start by placing your graham crackers in a food processor and pulsing until they reach a fine crumb consistency. If you don’t have a food processor, you can place the crackers in a zip-top bag and use a rolling pin to crush them. Aim for a texture similar to sand, as larger pieces can result in a crumbly crust that doesn’t hold together well.
2. Mixing with Butter and Sugar: In a medium mixing bowl, combine the crushed graham crackers with melted unsalted butter and granulated sugar. The butter acts as a binding agent, so be sure to mix thoroughly until all the crumbs are evenly coated. The mixture should hold together when pressed; if it appears too dry, you can add a touch more melted butter.
3. Pressing the Crust into Cups: For individual servings, use small cups or jars to form your crust. Scoop a portion of the graham cracker mixture into the bottom of each cup and use the back of a spoon or your fingers to press it down firmly. Aim for an even layer that covers the bottom of the cup and is slightly compacted. This will ensure a sturdy base for your cheesecake filling.
4. Chilling the Crust: Once you’ve pressed the crust into the cups, place them in the refrigerator for at least 30 minutes. Chilling the crust allows the butter to firm up, creating a more stable base for the filling. This step is crucial for preventing the crust from crumbling when you serve the cheesecake cups.
With the crust prepared and chilling in the refrigerator, you’ll be ready to move on to crafting the cheesecake filling—a step that promises to be just as delightful as the crust itself. Stay tuned for the next part, where we will explore how to combine the creamy ingredients into a luscious filling that will make these Zesty No-Bake Key Lime Cheesecake Cups truly unforgettable.
Step-by-Step Guide on Making the Cheesecake Mixture
Creating the perfect cheesecake filling for your Zesty No-Bake Key Lime Cheesecake Cups is a straightforward yet crucial process. The first step involves preparing your cream cheese. To achieve a luxuriously smooth texture, it’s essential to soften the cream cheese before mixing. This can be done by leaving it out at room temperature for about 30 minutes. If you’re short on time, you can microwave it for about 10-15 seconds, but be careful not to melt it.
Importance of Softening Cream Cheese for a Smooth Texture
Softening cream cheese is vital because it allows for easier blending and prevents lumps in your cheesecake mixture. A lumpy filling not only affects the texture but can also compromise the overall presentation of your dessert. When you start with softened cream cheese, you reduce the effort required during mixing, which leads to a smoother, creamier consistency.
Mixing Techniques to Achieve Fluffiness and Creaminess
Once the cream cheese is softened, place it in a large mixing bowl. Using an electric mixer, beat the cream cheese on medium speed until it’s smooth and creamy. This process typically takes about 2-3 minutes. Next, gradually add in your sugar and continue to beat the mixture until fully combined. This step is crucial for ensuring that the sugar dissolves completely, contributing to a light and airy filling.
Once your sugar is incorporated, it’s time to add the key lime juice, lime zest, and vanilla extract. Mix these ingredients until they are just combined, ensuring you don’t over-mix. Over-mixing can lead to a denser filling, which is not the goal for a no-bake cheesecake. The key is to incorporate flavors gently, maintaining that desired fluffiness.
Assembling the Cheesecake Cups
With your cheesecake mixture ready, it’s time to assemble your delicious dessert. Begin by scooping the cheesecake filling into your pre-prepared crusts. You can either use a piping bag for a more polished look or simply spoon the mixture in. If you’re using a piping bag, cut the tip to create a medium-sized opening for easy filling.
Instructions on Layering the Cheesecake Filling into the Crust
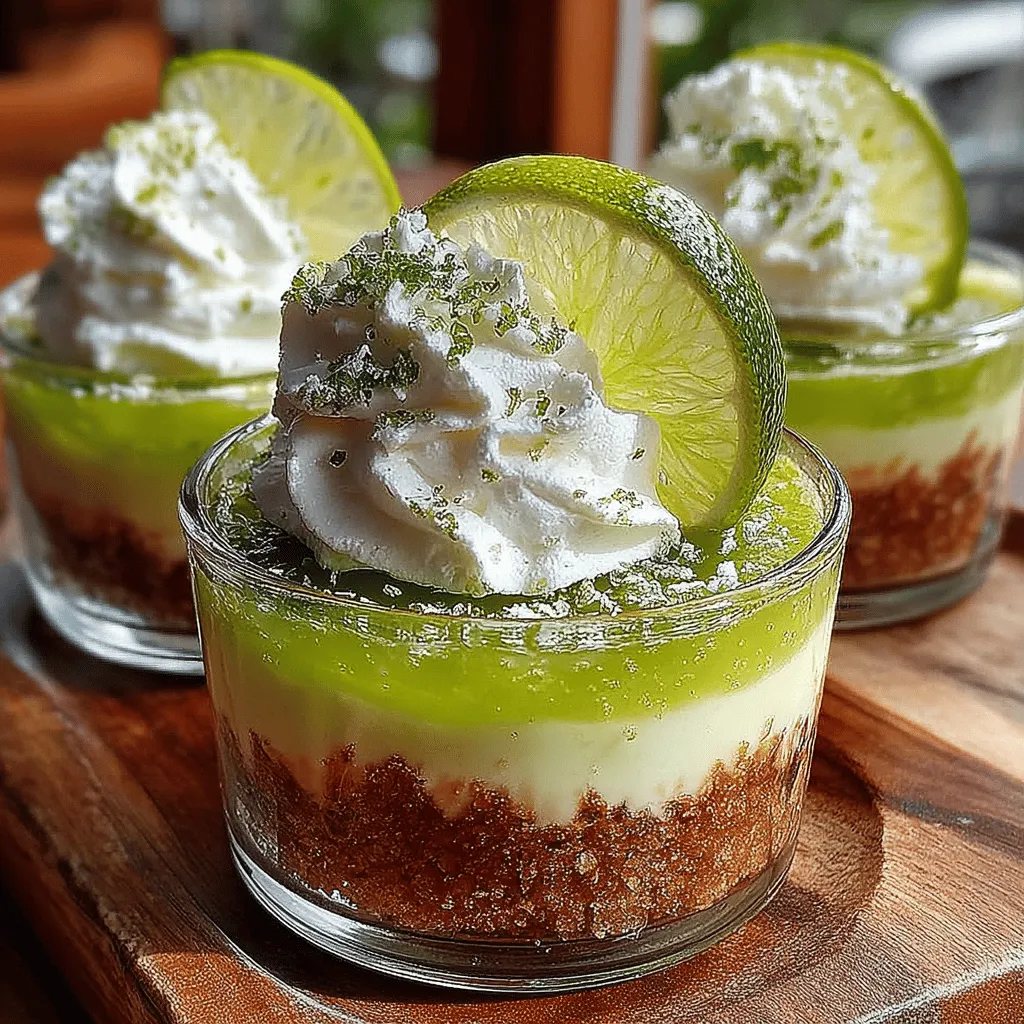
Start by adding a few spoonfuls of the cheesecake filling into each cup, filling them about halfway. Next, use a spatula or the back of a spoon to smooth the surface of the filling. This step is not just for aesthetics; a smooth surface ensures the subsequent layer remains even, enhancing the overall appeal of your dessert.
Importance of Smoothing the Surface for Presentation
Presentation plays a significant role in how your dessert is perceived. A well-smoothened surface indicates attention to detail and elevates the overall experience. After smoothing the filling, you can add another layer of the crust and then top with more cheesecake filling, ensuring it reaches just below the rim of the cup.
Tips for Portion Control to Ensure Even Servings
When assembling your cheesecake cups, it’s crucial to keep portion control in mind. Using a measuring cup or a scale can help ensure that each cup receives an equal amount of filling. This not only makes for a more visually appealing presentation but also ensures that each guest enjoys a consistent taste experience.
Chilling for Perfection
Once your cheesecake cups are assembled, the next step is chilling. Chilling is essential for setting the cheesecake and allowing the flavors to meld beautifully. Place your assembled cups in the refrigerator and let them chill for at least 4 hours, although overnight is ideal for optimal flavor and texture development.
Explain the Chilling Process and Its Significance in Setting the Cheesecake
During the chilling process, the filling will firm up as the cream cheese and whipped cream stabilize. This transformation is crucial; without adequate chilling, you risk a runny filling that won’t hold its shape when served. The cold environment allows the ingredients to marry, resulting in a rich, zesty flavor profile that’s unmistakably key lime.
Suggested Chilling Times and How to Tell When the Filling is Ready
For best results, allow your cheesecake cups to chill for about 4-6 hours. If you’re in a hurry, a minimum of 2 hours can work, but the texture may be less firm. To check if they are ready, gently press the filling with a fingertip; it should feel set but still have a slight bounce. If it feels soft or liquidy, allow them to chill for a bit longer.
Serving Suggestions
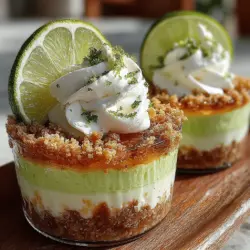
When it comes to serving your Zesty No-Bake Key Lime Cheesecake Cups, presentation is key. Start by garnishing each cup with a generous dollop of whipped cream atop the cheesecake filling. The light, airy texture of the whipped cream complements the denser cheesecake beautifully.
Ideas for Garnishing the Cheesecake Cups
In addition to whipped cream, consider adding a sprinkle of fresh lime zest on top. This not only enhances the visual appeal but also intensifies the zesty lime flavor, providing a burst of freshness with every bite. You can also add a few slices of lime or even a mint leaf for a touch of color and an aromatic element.
Importance of Whipped Cream and Lime Zest for Visual Appeal
Whipped cream and lime zest create a delightful contrast in textures and flavors, making your cheesecake cups not only delicious but visually stunning. The bright green of the zest against the creamy white filling makes for an inviting presentation, perfect for any occasion.
Discussing Variations for Serving
Feel free to get creative with your toppings. Consider adding fresh berries like strawberries, blueberries, or raspberries for a pop of color and flavor that pairs wonderfully with the tangy cheesecake. Alternatively, you could try a drizzle of chocolate sauce or a sprinkle of graham cracker crumbs for an added crunch. The possibilities are endless!
Nutritional Information
While indulging in a dessert like Zesty No-Bake Key Lime Cheesecake Cups, it’s essential to consider the nutritional benefits of the ingredients. The key components—cream cheese, lime juice, and whipped cream—each provide unique benefits.
General Overview of the Nutritional Benefits of the Ingredients
Cream cheese is a good source of calcium and protein, while lime juice is rich in vitamin C and antioxidants, which can help boost your immune system. The graham cracker crust adds a touch of fiber, particularly if you opt for whole-grain options.
Discuss the Balance of Indulgence and Freshness in the Dessert
This dessert strikes a perfect balance between indulgence and freshness. It’s creamy and rich yet lightened by the zesty lime flavor, making it a refreshing treat, especially during warmer months. Enjoying this cheesecake in moderation allows you to indulge without overwhelming your palate.
Conclusion
In summary, creating Zesty No-Bake Key Lime Cheesecake Cups is a delightful culinary adventure that combines simplicity with flavor. This no-bake dessert is perfect for gatherings, warm-weather events, or simply as a refreshing treat for yourself at home. The ease of preparation, combined with the creamy, zesty filling, makes it a go-to recipe for any occasion.
We encourage you to try making this easy recipe for yourself and experience the delightful flavors it brings to your table. Whether you’re serving it at a party or enjoying it as a personal treat, these cheesecake cups are sure to impress and satisfy any sweet tooth. Enjoy the process, and don’t forget to share your delicious creations with friends and family!